Elastic Cloud: Elasticsearch Service API is now GA
The Elastic Cloud console gives you a single place to create and manage your deployments, view billing information, and stay informed about new releases. It provides an easy and intuitive user interface (UI) for common management and administrative tasks.
While a management UI is great, many organizations also want an API to automate common tasks and workflows, especially for managing their deployments. We’re excited to announce the general availability of the Elasticsearch Service API to enable these workflows.
In addition to integrating with the API directly, you can use Elastic Cloud Control (ecctl), Elastic Cloud’s command-line interface that now supports the Elasticsearch Service API. You can also use the cloud-sdk-go library or generate an SDK in another programming language.
Before we demonstrate an example of how to create and scale a deployment using Elasticsearch Service API, here are a few common scenarios where you can benefit from an API:
Integrating with CI/CD pipelines
For many of our users, the Elastic Stack is a critical part of their production stack. You might introduce changes to your application that affect Elasticsearch, such as optimizing queries or testing new Elastic Stack versions.
A CI/CD pipeline could, for example, automatically spin up a deployment to your exact specifications, potentially restoring from a snapshot to easily use a data set from your production cluster. This gives immediate feedback for a given code change in your application on a development or staging environment before upgrading your production environment.
Onboarding new teams and use cases
In addition to being part of the production stack, the Elastic Stack can be used for observability of both your application and your infrastructure. Rather than have a single deployment serve different purposes, we advise separating use cases and teams by using a dedicated deployment when possible. This reduces a lot of the friction around potential noisy neighbor effects where one team’s resource intensive use case — or even unintentional bugs — can affect other teams.
Elasticsearch Service makes managing any number of deployments a breeze. And now you can easily integrate your favorite configuration manager or infrastructure-as-code tool, such as Ansible, Chef, Puppet, and Terraform — or your internal company portal — with our API. When a new team registers and requests to create a new development stack, you can create a deployment for them using the right template for the job and size and configure it according to their needs, all without manual intervention.
Scaling deployments
Many of our users need a way to programmatically scale their deployment up to support an increase in usage or scale it down to reduce cost during inactive periods. These events can be predictable, such as an increase in traffic for an e-commerce website’s traffic due to a national holiday, or less anticipated, such as a change in resource utilization when there is an unplanned last-minute sale. Customers can implement these time-based or usage-based scaling workflows using an API.
If aiming for a metric-based scaling — disk space, CPU, or RAM — there are always considerations to keep in mind. For example, ensuring enough disk space is available after scaling down to support the current disk space usage.
How to get started with the Elasticsearch Service API
These examples are only a small sample of how leveraging our API can remove the need to log in to our user console to manage a deployment, and there are many more. Now we’ll focus on providing a quick walkthrough to demonstrate how you can create and scale a deployment using ecctl, our command-line tool, or curl directly to the REST API.
1. Create an API key
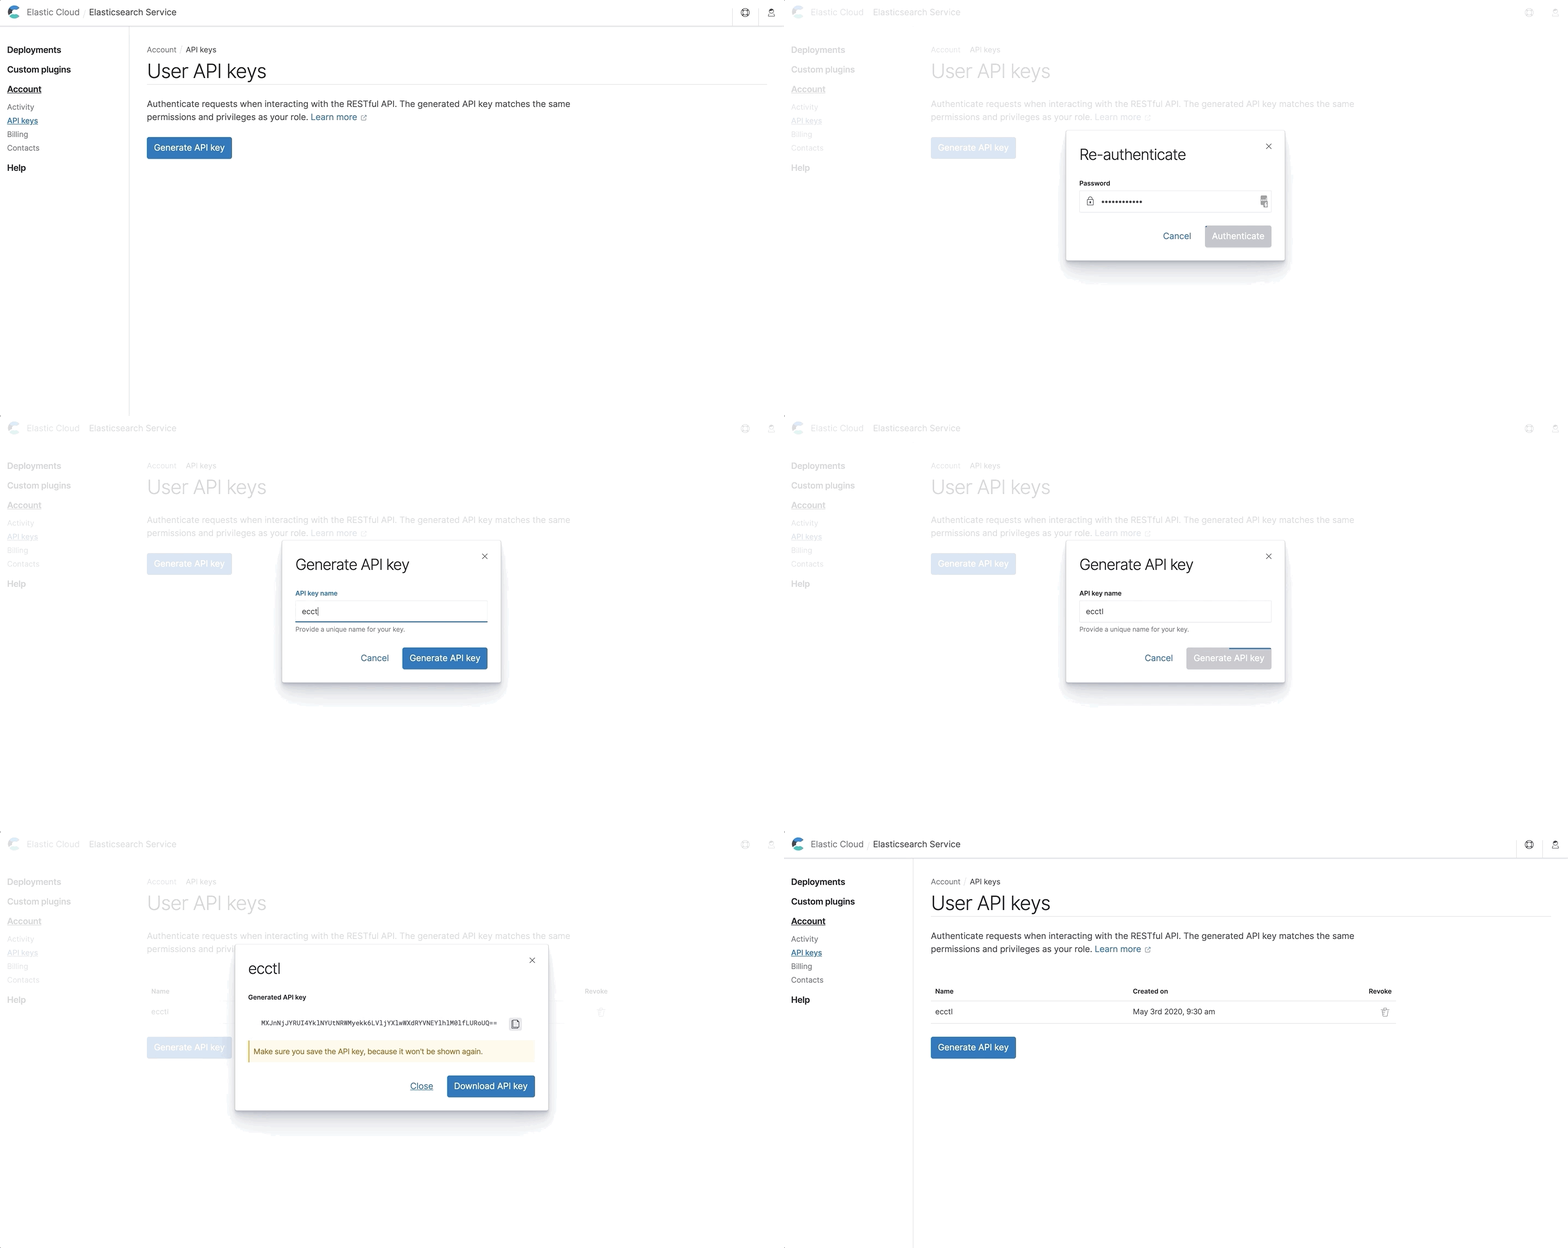
In order to authenticate, you must first generate an API key that will be used to identify you as the account owner. To generate an API key, log in to the user console and navigate to the API key management page under the Account section.
You can generate multiple API keys to more easily manage access from multiple applications and revoke one key without affecting the others.
When creating a new key, you’ll be required to re-enter your password, give the key a name, and then copy or download the key. It’s important to note this is the only time you’ll see the key, so be sure to store it somewhere safe.

2. Configure ecctl
If this is the first time you’re using ecctl, you’ll need to install it on your local machine. (You can see the installation instructions here.) If you already installed ecctl on your machine, make sure you’re using version 1.0.0-beta3 or above to ensure all the commands described here are supported. We’ll provide examples using curl as well, although we recommend using ecctl as it offers a much more user-friendly way to interact with our API.
Once you have it installed, you can run the ecctl init command and use the configuration wizard. When prompted to choose the product, select Elasticsearch Service, choose text or JSON format as the default output, API key as the authentication mechanism, and enter the API key saved in the previous step.
To test the configuration and make sure it’s correct, run the ecctl deployment list command, which will return the list of active deployments.

3. Create your first deployment
Now that you have everything we need, you can create your first deployment. Elasticsearch Service supports deployment templates, which quickly create a deployment with components and hardware that will best suit your use case.
When creating a deployment using our API, you’ll need to specify which template you wish to use, and the payload must align with the expected payload of the template. A list of available templates in your cloud provider and region of choice can be found in our user guide.
In this example, let’s use GCP Iowa (us-central1) and the I/O optimized template. Copy the JSON payload below and save it as a create-deployment.json file.
JSON payload:
{
  "name": "created-via-api",
  "resources": {
    "elasticsearch": [
      {
        "region": "gcp-us-central1",
        "ref_id": "main-elasticsearch",
        "plan": {
          "cluster_topology": [
            {
              "node_type": {
                "master": true,
                "data": true,
                "ingest": true
              },
              "instance_configuration_id": "gcp.data.highio.1",
              "zone_count": 2,
              "size": {
                "resource": "memory",
                "value": 2048
              }
            }
          ],
          "elasticsearch": {
            "version": "7.6.2"
          },
          "deployment_template": {
            "id": "gcp-io-optimized"
          }
        }
      }
    ],
    "kibana": [
      {
        "region": "gcp-us-central1",
        "elasticsearch_cluster_ref_id": "main-elasticsearch",
        "ref_id": "main-kibana",
        "plan": {
          "cluster_topology": [
            {
              "instance_configuration_id": "gcp.kibana.1",
              "zone_count": 1,
              "size": {
                "resource": "memory",
                "value": 1024
              }
            }
          ],
          "kibana": {
            "version": "7.6.2"
          }
        }
      }
    ],
    "apm": [
      {
        "region": "gcp-us-central1",
        "elasticsearch_cluster_ref_id": "main-elasticsearch",
        "ref_id": "main-apm",
        "plan": {
          "cluster_topology": [
            {
              "instance_configuration_id": "gcp.apm.1",
              "zone_count": 1,
              "size": {
                "resource": "memory",
                "value": 512
              }
            }
          ],
          "apm": {
            "version": "7.6.2"
          }
        }
      }
    ]
  }
}
Additional configuration options are available, such as setting a monitoring cluster and restoring from snapshot. But in this example, we will keep it simple and create a new deployment with a highly available Elasticsearch cluster deployed across two availability zones, a single instance of Kibana, and a single APM server. Now all that’s left to do is run the following ecctl command, and the deployment creation will be underway.
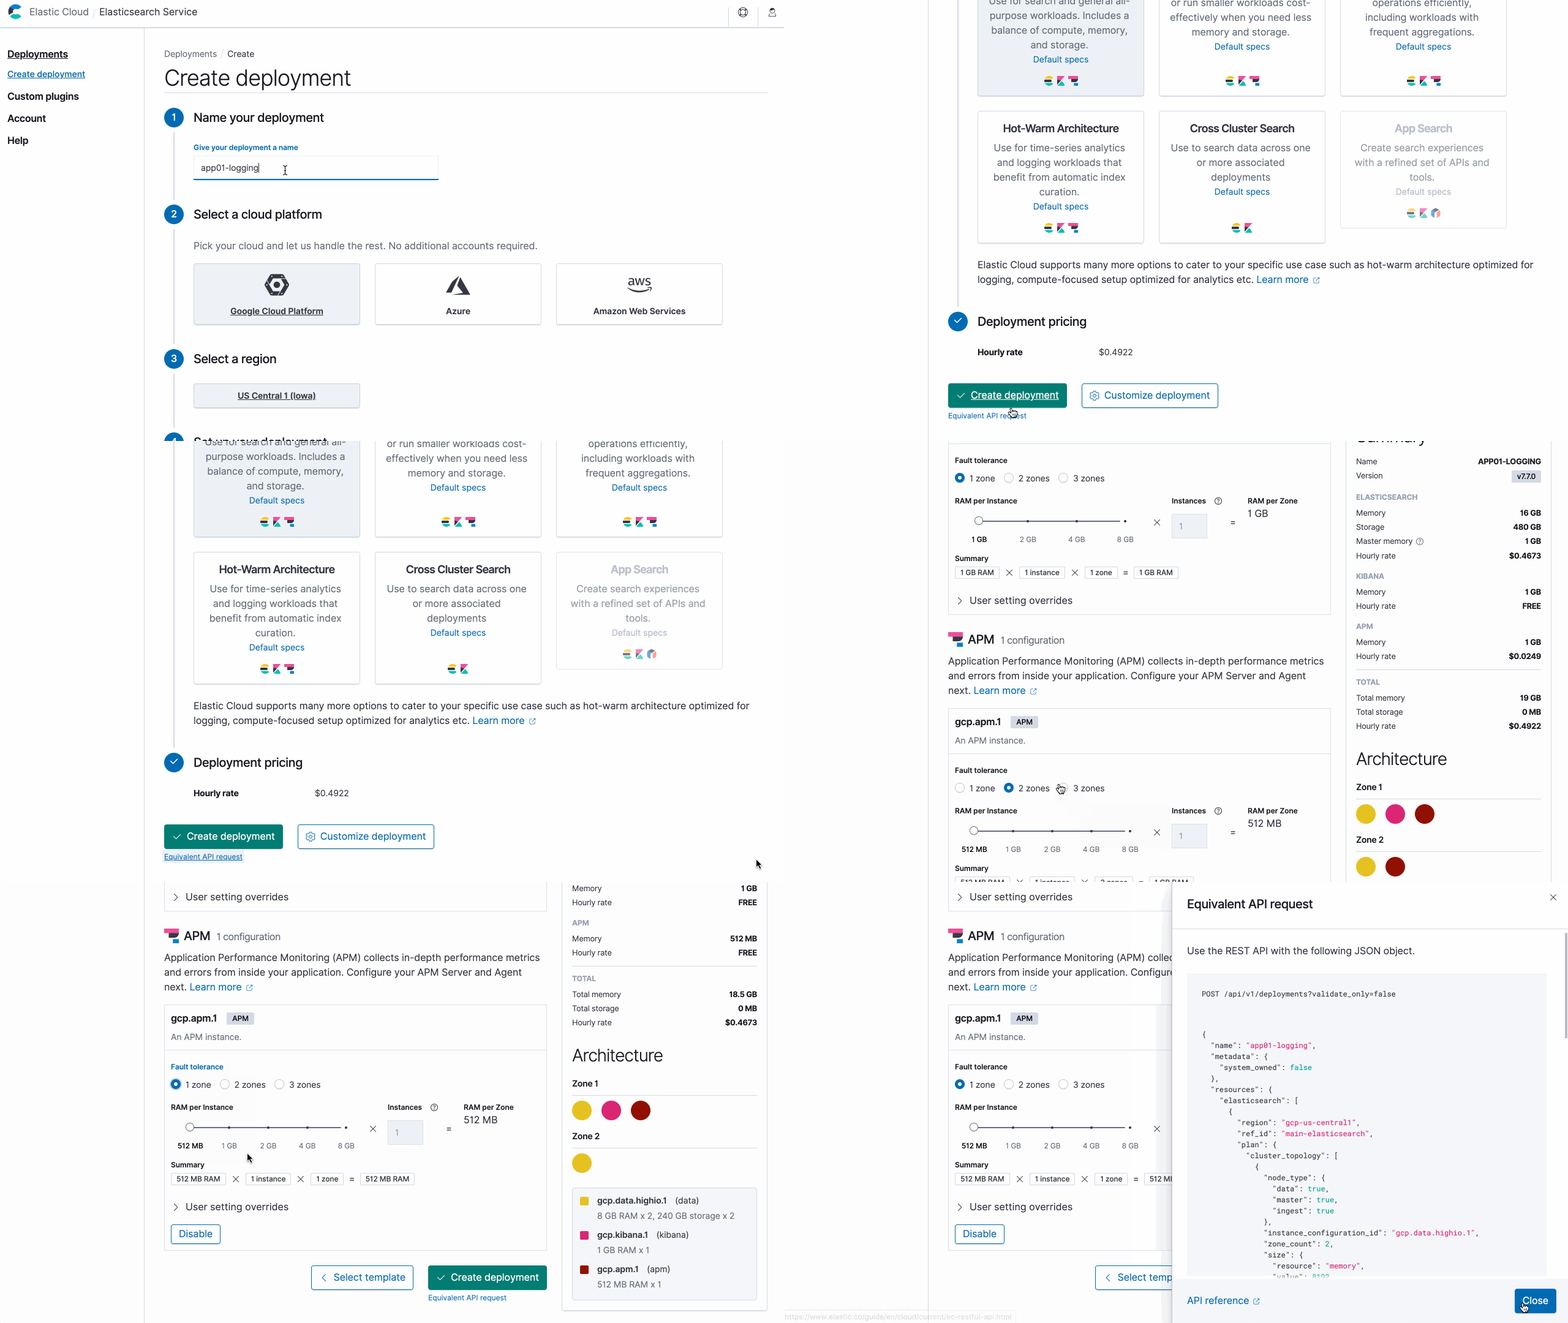
Also, get a feel for the API in a flash using the Elastic Cloud user console to output the equivalent API request to match what you’ve configured in the user interface.

ecctl:
ecctl deployment create -f create-deployment.json
To monitor progress, use the --track flag, not just here but in other commands as well. In general, the --help flag is very useful to learn which options are available.
If using curl, the following command will do the same.
curl:
curl -XPOST https://api.elastic-cloud.com/api/v1/deployments \
-H "Authorization: ApiKey <API_KEY>" \
-d @create-deployment.json
The response will indicate the request was submitted successfully and return the deployment ID. Copy it since you’ll need it when scaling your cluster in the next step. It will also include the randomly generated password for the elastic user so you can immediately use that to either log in to Kibana or use Elasticsearch REST API to further configure and start using your deployment.

4. Scale your deployment
Now that our deployment is up and running, let’s take a look at how you can scale it. In this example, you’ll increase the size of our data nodes from 4,096 to 8,192MB. It’s important to note that since you’re only making changes to your Elasticsearch cluster, you should set the prune_orphans field to false to indicate that other components that are part of your deployment — in this case, Kibana and APM — shouldn't be removed.
Copy the JSON payload below and save it as update-deployment.json file.
JSON payload:
{
  "prune_orphans": false,
  "resources": {
    "elasticsearch": [
      {
        "region": "gcp-us-central1",
        "ref_id": "main-elasticsearch",
        "plan": {
          "cluster_topology": [
            {
              "zone_count": 2,
              "node_type": {
                "master": true,
                "data": true,
                "ingest": true,
                "ml": false
              },
              "instance_configuration_id": "gcp.data.highio.1",
              "size": {
                "resource": "memory",
                "value": 4096
              }
            }
          ],
          "elasticsearch": {
            "version": "7.6.2"
          },
          "deployment_template": {
            "id": "gcp-io-optimized"
          }
        }
      }
    ]
  }
}
This time you’ll use the update command.
ecctl:
ecctl deployment update <DEPLOYMENT_ID> -f update-deployment.json
When using curl, you’ll use the PUT method to submit the new plan.
curl:
curl -XPUT https://api.elastic-cloud.com/api/v1/deployments/<DEPLOYMENT_ID> \
-H "Authorization: ApiKey <API_KEY>" \
-d @update-deployment.json
In some cases you might want to cancel a plan before it’s completed. You can use ecctl to cancel the plan command, passing “elasticsearch” as the type, and when using curl, submit a request to delete the pending plan and specify Elasticsearch ref-id, i.e. “main-elasticsearch.”
ecctl:
ecctl deployment plan cancel <DEPLOYMENT_ID> --kind elasticsearch
curl:
curl -XDELETE https://api.elastic-cloud.com/api/v1/deployments/<DEPLOYMENT_ID>/elasticsearch/main-elasticsearch/plan/pending \
-H "Authorization: ApiKey <API_KEY>"
5. Cleaning up
In the last step, you’ll delete the deployment you created using the shutdown command.
ecctl:
ecctl deployment shutdown <DEPLOYMENT_ID>
When submitting a destruction action, ecctl will promote a confirmation message before executing. You can use the --force global flag, which can be useful if you’re going to use it for automation.
When using curl you can submit the following request:
curl:
curl -XPOST https://api.elastic-cloud.com/api/v1/deployments/<DEPLOYMENT_ID>/_shutdown \
-H "Authorization: ApiKey <API_KEY>"
Wrapping up
We looked at different use cases for deployment automation to show how you can create, scale, and eventually shut down a deployment. There are many other ways you can use our API to automate various procedures and reduce the amount of human interaction required to manage your deployments, too.
To view the full list of available API endpoints, head over to the API examples in the RESTful API section in our user guide.
New to Elasticsearch Service? Sign up for a free 14-day trial to try it out.