From vector search to powerful REST APIs, Elasticsearch offers developers the most extensive search toolkit. Dive into sample notebooks on GitHub to try something new. You can also start your free trial or run Elasticsearch locally today.
Introduction
In a world of global users, cross-lingual information retrieval (CLIR) is crucial. Instead of limiting searches to a single language, CLIR lets you find information in any language, enhancing user experience and streamlining operations. Imagine a global market where e-commerce customers can search for items in their language, and the right results would pop up, without the need for localizing the data ahead of time. Or, where academic researchers can search for papers in their native language, with nuance and complexity, even if the source is in another language.
Multilingual text embedding models allow us to do just that. Embeddings are a way to represent the meaning of text as numerical vectors. These vectors are designed so that texts with similar meanings are located close to each other in a high-dimensional space. Multilingual text embedding models specifically are designed to map words and phrases with the same meaning across different languages into a similar vector space.
Models like the open-source Multilingual E5 are trained on massive amounts of text data, often using techniques like contrastive learning. In this approach, the model learns to distinguish between pairs of texts with similar meanings (positive pairs) and those with dissimilar meanings (negative pairs). The model is trained to adjust the vectors it produces such that the similarity between positive pairs is maximized, and the similarity between negative pairs is minimized. For multilingual models, this training data includes text pairs in different languages that are translations of each other, enabling the model to learn a shared representation space for multiple languages. The resulting embeddings can then be used for various NLP tasks, including cross-lingual search, where the similarity between text embeddings is used to find relevant documents regardless of the language of the query.
Benefits of multilingual vector search
- Nuance: Vector search excels at capturing semantic meaning, going beyond keyword matching. This is crucial for tasks that require understanding context and subtleties in language.
- Cross-Lingual Understanding: Enables effective information retrieval across languages, even when the query and documents use different vocabulary.
- Relevance: Delivers more relevant results by focusing on the conceptual similarity between queries and documents.
For example, consider an academic researcher studying the "impact of social media on political discourse" across different countries. With vector search, they can input queries like "l'impatto dei social media sul discorso politico" (Italian) or "ảnh hưởng của mạng xã hội đối với diễn ngôn chính trị" (Vietnamese) and find relevant papers in English, Spanish, or any other indexed language. This is because vector search identifies papers that discuss the concept of social media's influence on politics, not just those containing the exact keywords. This greatly enhances the breadth and depth of their research.
Getting Started
Here's how to set up CLIR using Elasticsearch - with the E5 model that is provided out of the box. We’ll use the open-source multilingual COCO dataset, which contains image captions in multiple languages, to help us visualize 2 types of searches:
- Queries and search terms in other languages on one English dataset, and
- Queries in multiple languages on top of a dataset containing documents in multiple languages.
Then, we will leverage the power of hybrid search and reranking to improve the search results even further.
Prerequisites
- Python 3.6+
- Elasticsearch 8+
- Elasticsearch Python client: pip install elasticsearch
Dataset
The COCO dataset is a large-scale captioning dataset. Each image in the dataset is captioned in multiple different languages, with several translations available per language. For demonstration purposes, we’ll index each translation as an individual document, along with the first available English translation for reference.

Step 1: download the Multilingual COCO Dataset
To simplify the blog and make it easier to follow along, here we are loading the first 100 rows of the restval into a local JSON file with a simple API call. Alternatively, you can use HuggingFace’s library datasets to load the full dataset or subsets of the dataset.
If the data is loaded into a JSON file successfully you should see something similar to the following:
Data successfully downloaded and saved to multilingual_coco_sample.json
Step 2: (Start Elasticsearch) and index the data in Elasticsearch
a) Start your local Elasticsearch server.
b) Initiate the Elasticsearch client.
c) Index data
Once the data is indexed, you should see something similar to the following:
Successfully bulk indexed 4840 documents
Indexing complete!
Step 3: Deploy the E5 trained model
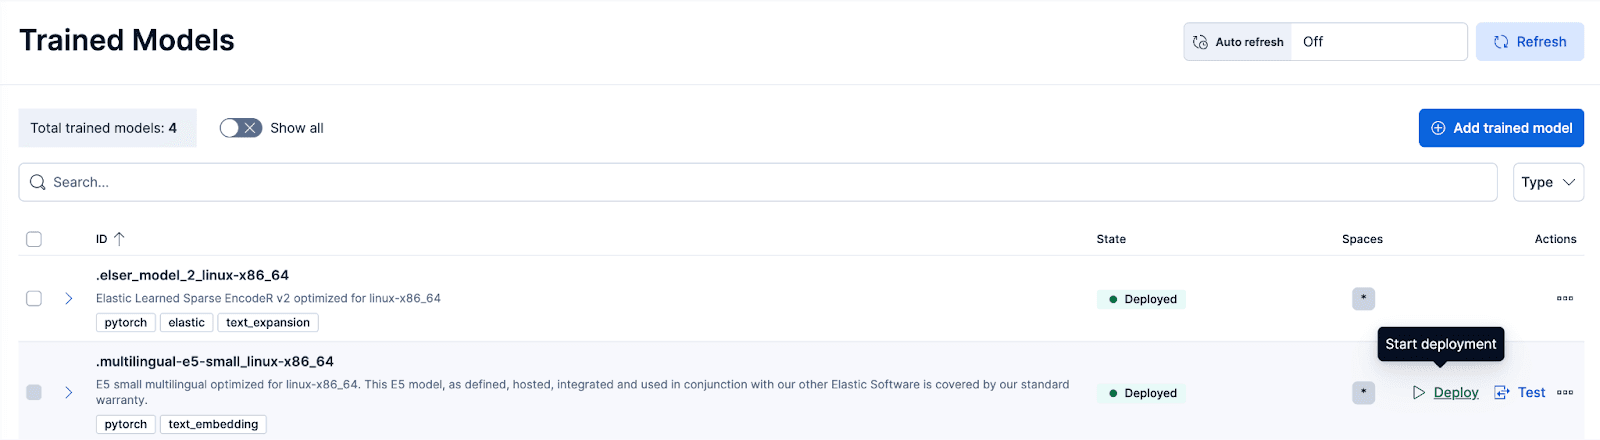
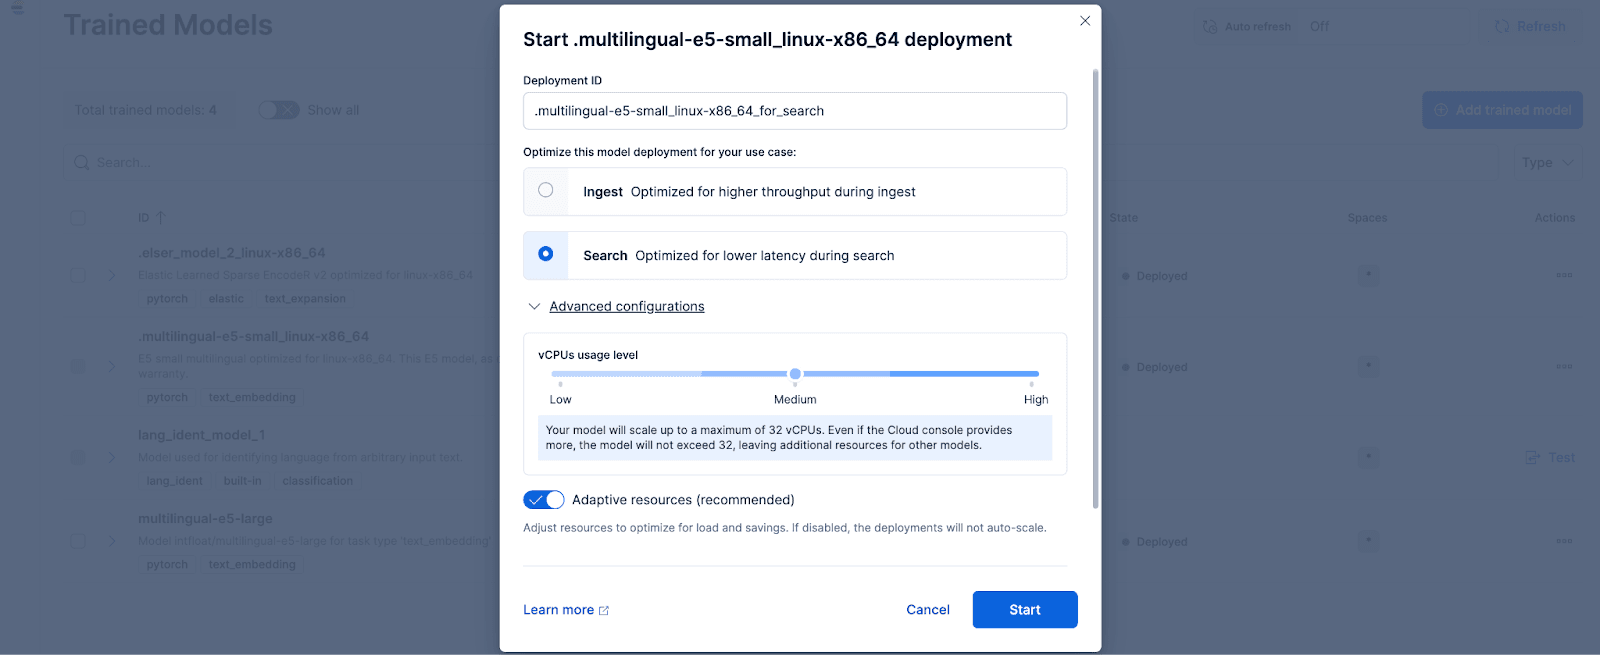
In Kibana, navigate to the Stack Management > Trained Models page, and click Deploy for the .multilingual-e5-small_linux-x86_64 option. This E5 model is a small multilingual optimized for linux-x86_64, which we can use out of the box. Clicking on ‘Deploy’ will show a screen where you can adjust the deployment settings or vCPUs configurations. For simplicity, we will go with the default options, with adaptive resources selected, which will auto-scale our deployment depending on usage.
Optionally, if you want to use other text embedding models, you can. For example, to use the BGE-M3, you can use Elastic’s Eland Python client to import the model from HuggingFace.
Then, navigate to the Trained Models page to deploy the imported model with the desired configurations.
Step 4: Vectorize or create embeddings for the original data with the deployed model
To create the embeddings, we first need to create an ingest pipeline that will allow us to take the text and run it through the inference text embedding model. You can do this in Kibana's user interface or through Elasticsearch’s API.
To do this via the Kibana interface, after deploying the Trained Model, click the Test button. This will give you the ability to test and preview the generated embeddings. Create a new data view for the coco index, set Data view to the newly created coco data view, and set the Field to description because that’s the field we want to generate embeddings for.
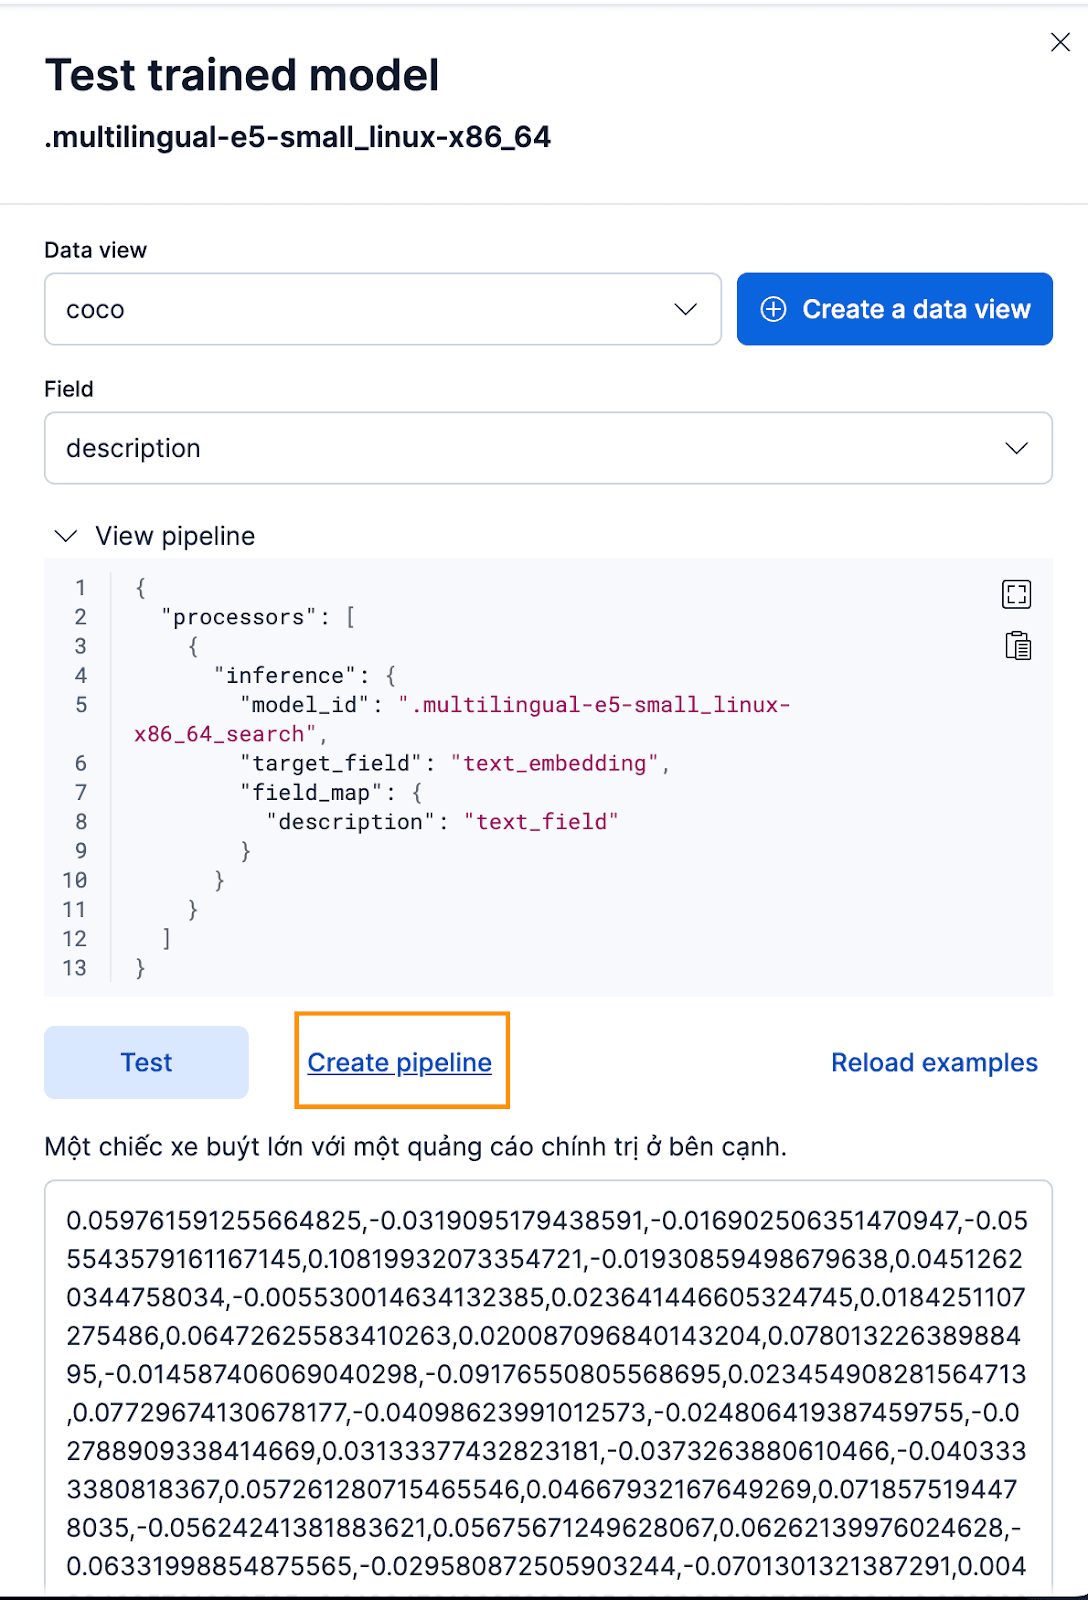
That works great! Now we can proceed to create the ingest pipeline and reindex our original documents, pass them through the pipeline, and create a new index with the embeddings. You can achieve this by clicking Create pipeline, which will guide you through the pipeline creation process, with auto-populated processors needed to help you create the embeddings.
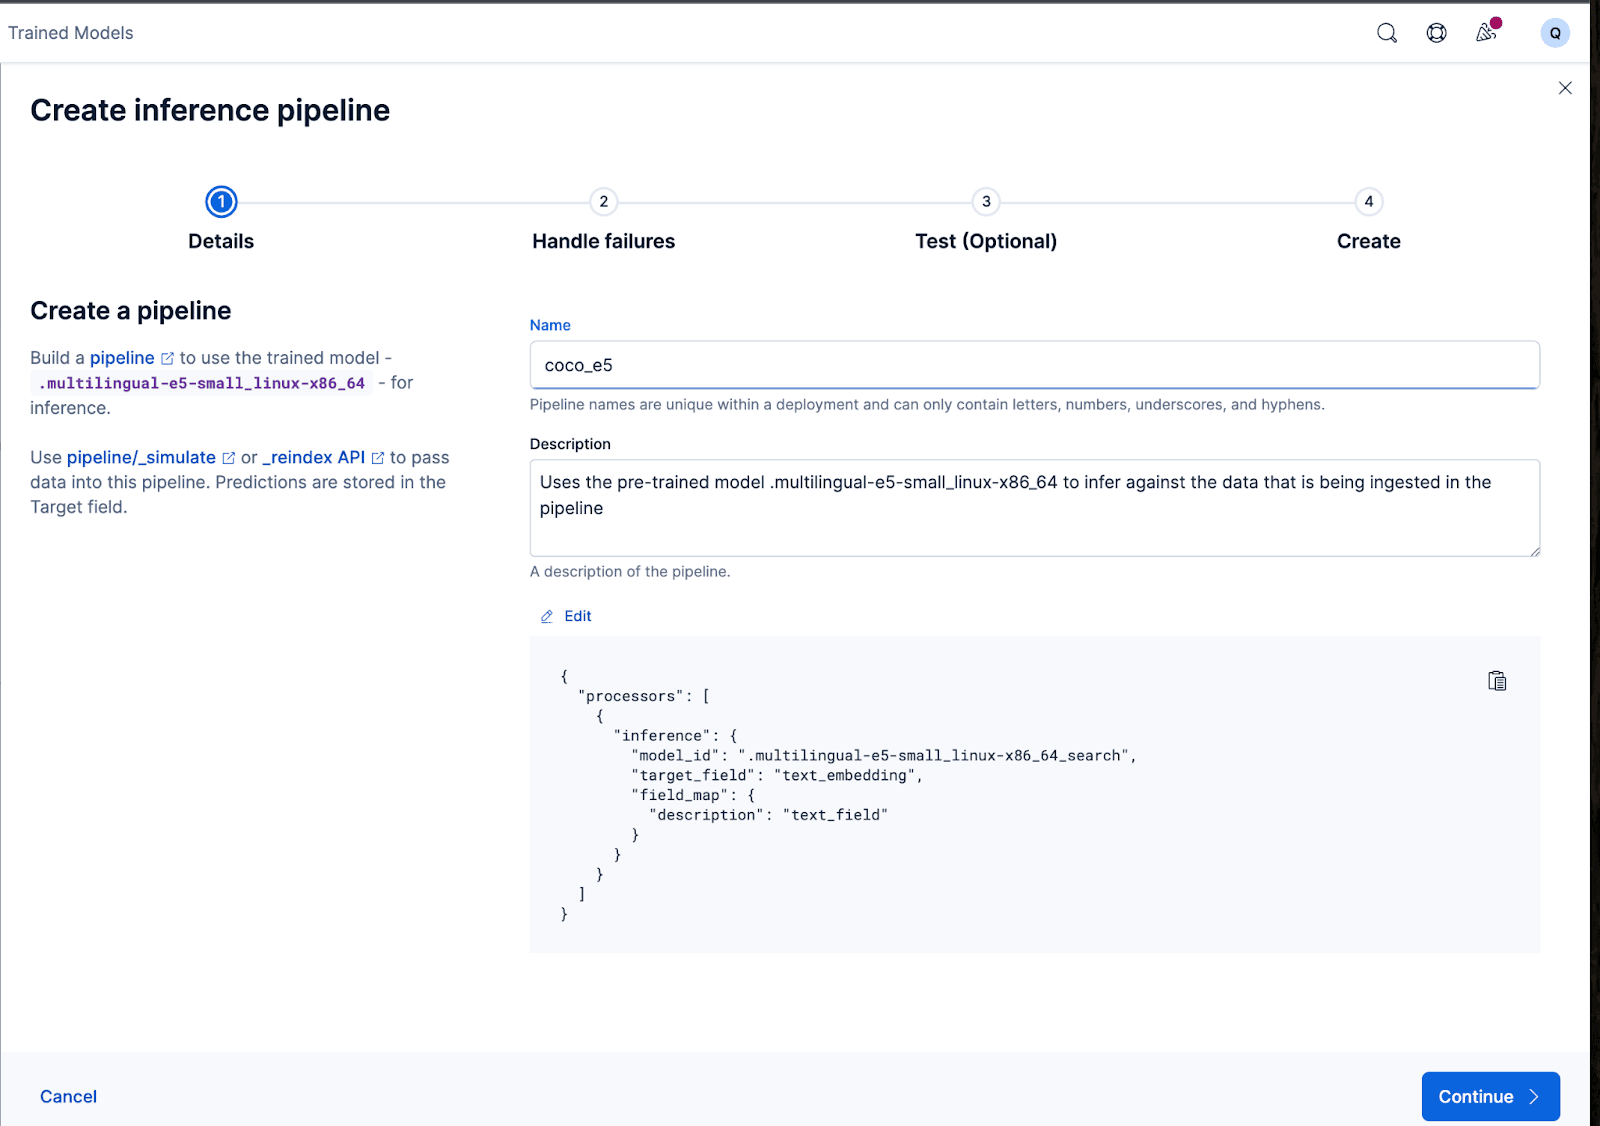
The wizard can also auto-populate the processors needed to handle failures while ingesting and processing the data.

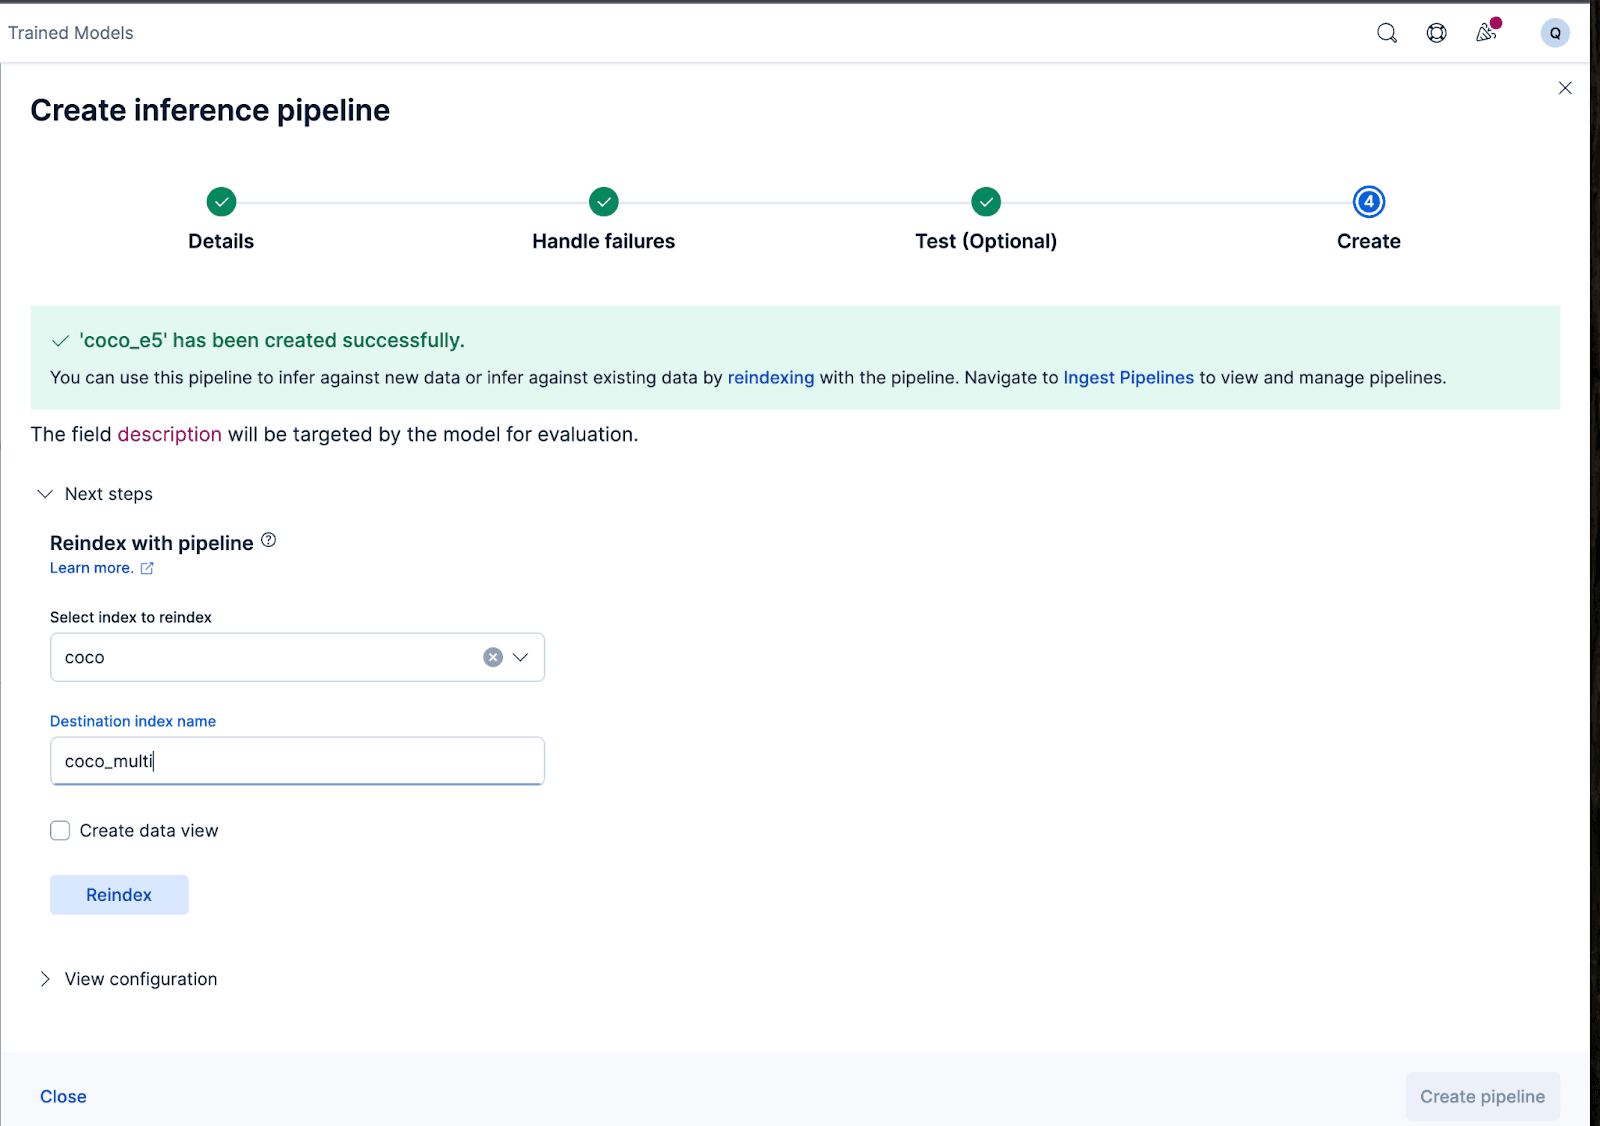
Let’s now create the ingest pipeline. I’m naming the pipeline coco_e5. Once the pipeline is created successfully, you can immediately use the pipeline to generate the embeddings by reindexing the original indexed data to a new index in the wizard. Click Reindex to start the process.
For more complex configurations, we can use the Elasticsearch API.
For some models, because of the way the models were trained, we might need to prepend or append certain texts to the actual input before generating the embeddings; otherwise, we will see a performance degradation.
For example, with the e5, the model expects the input text to follow “passage: {content of passage}”. Let’s utilize the ingest pipelines to accomplish that: We’ll create a new ingest pipeline vectorize_descriptions. In this pipeline, we will create a new temporary temp_desc field, prepend “passage: “ to the description text, run temp_desc through the model to generate text embeddings, and then delete the temp_desc.
In addition, we might want to specify what type of quantization we want to use for the generated vector. By default, Elasticsearch uses int8_hnsw, but here I want Better Binary Quantization (or bqq_hnsw), which reduces each dimension to a single bit precision. This reduces the memory footprint by 96% (or 32x) at a larger cost of accuracy. I’m opting for this quantization type because I know I’ll use a reranker later on to improve the accuracy loss.
To do that, we will create a new index named coco_multi, and specify the mappings. The magic here is in the vector_description field, where we specify the index_options’s type to be bbq_hnsw.
Now, we can reindex the original documents to a new index, with our ingest pipeline that will “vectorize” or create embeddings for the descriptions field.
And that’s it! We’ve successfully deployed a multilingual model with Elasticsearch and Kibana and learned step-by-step how to create the vector embeddings with your data with Elastic, either through the Kibana user interface or with the Elasticsearch API. In the second part of this series, we’ll explore the results and the nuances of using a multilingual model. In the meantime, you can create a Cloud cluster of your own to try multilingual semantic search using our out-of-the-box E5 model on the language and dataset of your choice.
Related Content

January 28, 2026
Apache Lucene 2025 wrap-up
2025 was a stellar year for Apache Lucene; here are our highlights.
January 21, 2026
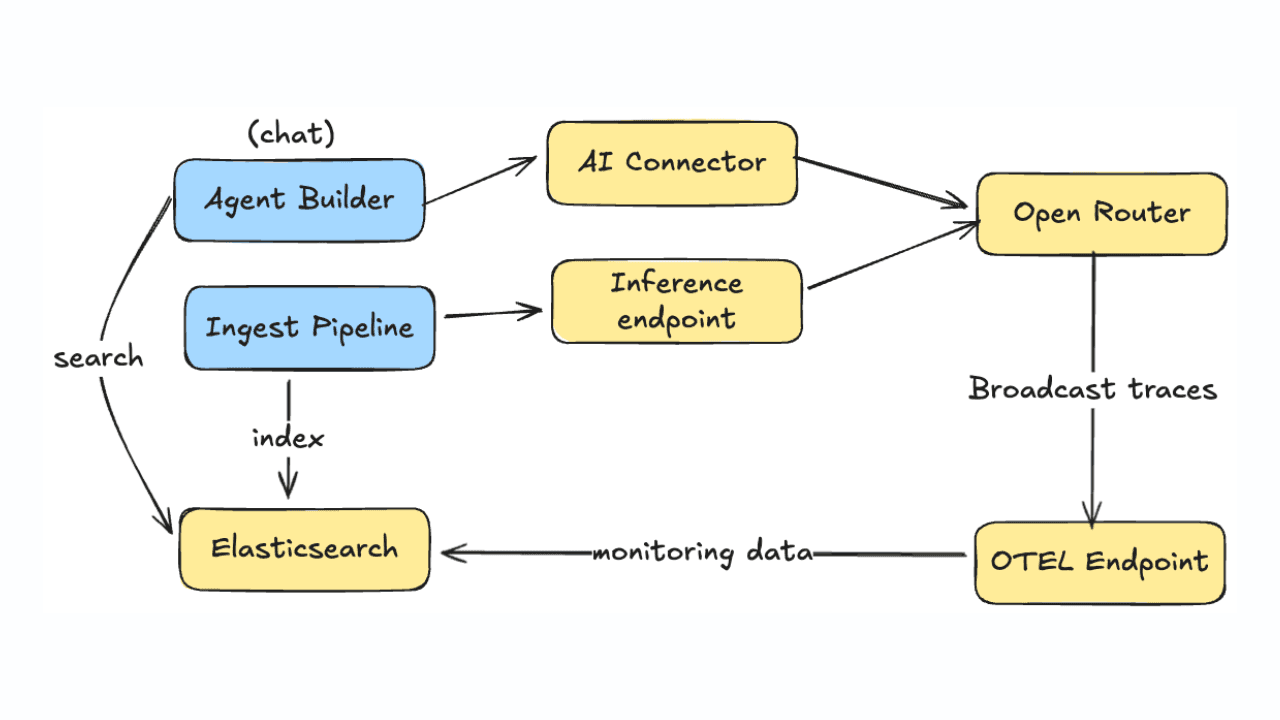
Monitoring LLM inference and Agent Builder with OpenRouter
Learn how to monitor LLM usage, costs, and performance across Agent Builder and inference pipelines using OpenRouter's OpenTelemetry broadcast and Elastic APM.

January 14, 2026
Higher throughput and lower latency: Elastic Cloud Serverless on AWS gets a significant performance boost
We've upgraded the AWS infrastructure for Elasticsearch Serverless to newer, faster hardware. Learn how this massive performance boost delivers faster queries, better scaling, and lower costs.
December 23, 2025
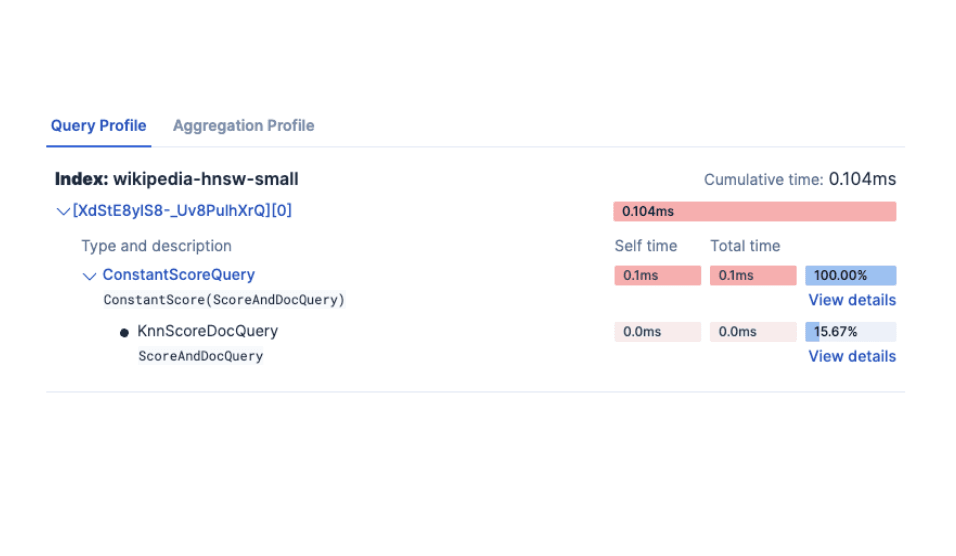
Comparing dense vector search performance with the Profile API in Elasticsearch
Learn how to use the Profile API in Elasticsearch to compare dense vector configurations and tune kNN performance with visual data from Kibana.
December 9, 2025
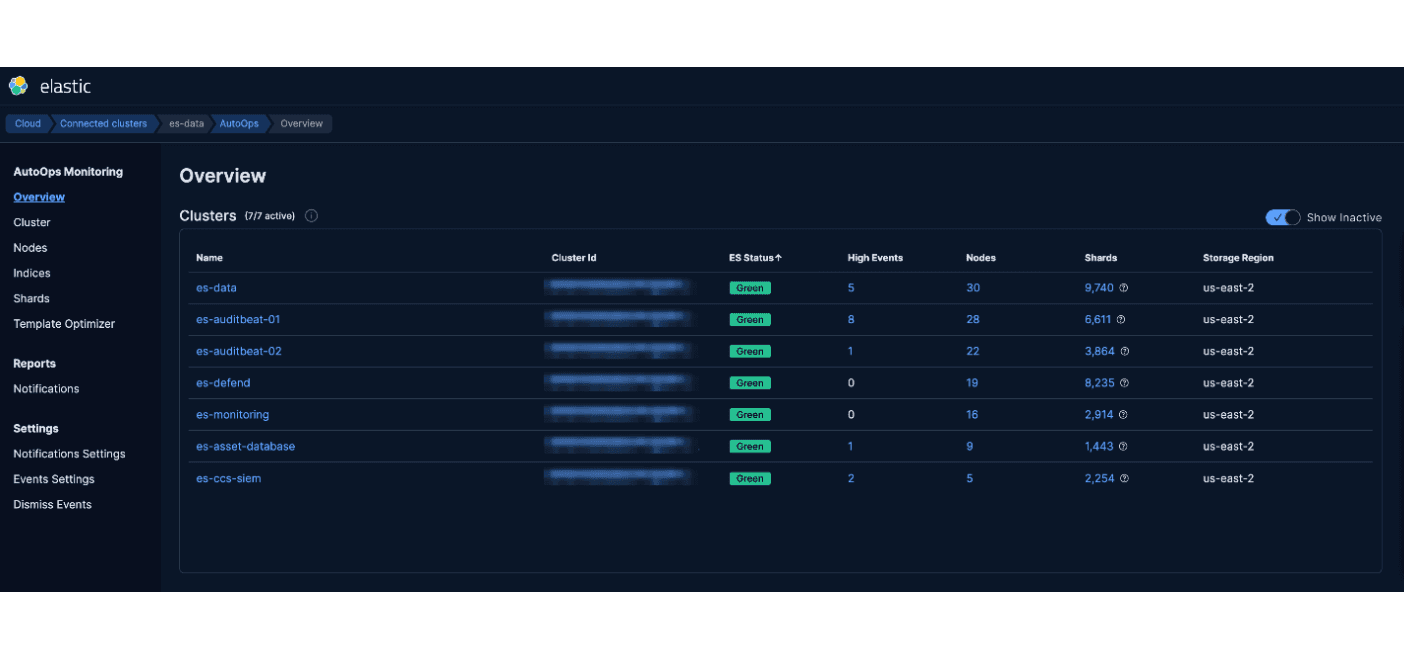
AutoOps in action: Investigating Elasticsearch cluster performance on ECK
Explore how Elastic's InfoSec team implemented AutoOps in a multi-cluster ECK environment, cutting cluster performance investigation time from 30+ minutes to five minutes.