It is time to say goodbye: This version of Elastic Cloud Enterprise has reached end-of-life (EOL) and is no longer supported.
The documentation for this version is no longer being maintained. If you are running this version, we strongly advise you to upgrade. For the latest information, see the current release documentation.
Work with snapshots
editWork with snapshots
editSnapshots provide backups of your Elasticsearch indices. You can use snapshots to recover from a failure when not enough availability zones are used to provide high availability or to recover from accidental deletion.
Before you begin
editTo enable snapshots for your Elasticsearch clusters and to work with them, you must have configured a repository. After you have configured a snapshot repository, a snapshot is taken every 30 minutes or at the interval you specify through your user settings.
You can configure the ECE snapshot count to keep up to a maximum of the 100 most recent, successful snapshots. Once your cluster has reached the total snapshot count, ECE removes old snapshots as new ones are taken.
Snapshots back up only open indices. If you close an index, it is not included in snapshots and you will not be able to restore the data.
List available snapshots
editTo list all available snapshots:
- Log into the Cloud UI.
-
On the Deployments page, select your deployment.
Narrow the list by name, ID, or choose from several other filters. To further define the list, use a combination of filters.
- From your deployment menu, go to Elasticsearch and then Snapshots where the list of available snapshots is shown, newest first.
- Click on a specific snapshot to see more details.
The list shows when the snapshot was completed, whether the snapshot succeeded or was only partially successful, along with the number of shards and indices in the snapshot.
Configure the snapshot retention period
editNow that you can set the snapshot interval and count, you can have control over the retention period for your clusters. The calculation displayed is based on a projected estimate of the snapshot interval, expected snapshot count, and current cluster size. Changing any of these factors results in a different retention period.
Change the snapshot interval
editIf you find the the default snapshot interval isn’t working for your environment, you can change it. It might make sense to use a 4 or 24 hour interval if the data in your index doesn’t change that often but you need more snapshot history.
-
Log into the Cloud UI and select your deployment.
Narrow the list by name, ID, or choose from several other filters. To further define the list, use a combination of filters.
- Open the Snapshot settings section.
- Make a selection from the Snapshot interval drop-down menu.
- Click Update settings.
When you change the interval, the interval timer begins after the next scheduled snapshot.
Change the snapshot count
editYou can get more control over your repository space by adjusting the number of snapshots that are stored for your cluster. The minimum number of snapshots must be at least 15, the maximum limit is 100.
-
Log into the Cloud UI and select your deployment.
Narrow the list by name, ID, or choose from several other filters. To further define the list, use a combination of filters.
- Open the Snapshot settings section.
- Enter a number in the Snapshot count field.
- Click Update settings.
Restore a snapshot
editTo restore a snapshot:
- List the available snapshots, and click on the timestamp link of a snapshot to see the snapshot details.
-
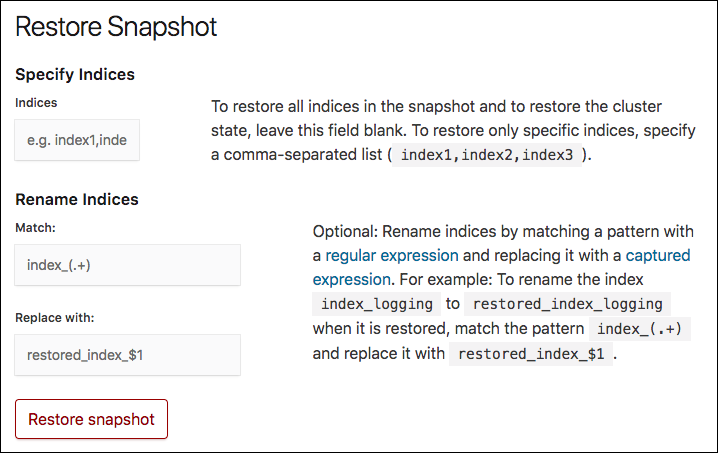
Optional: In the Restore Snapshot section, specify how you want to restore the snapshot. If you do not specify any options, all the indices of the snapshot are restored on the Elasticsearch cluster where the snapshot was taken.

-
In the Specify Indices field, you can limit which indices get restored by specifying an index pattern. For example, entering
logstash-*,.kibanarestores any indices starting withlogstash-as well as the.kibanaindex. All other indices are ignored. - You might need to specify values in the Match and Replace with fields, if you restore to the same cluster, as you cannot restore to an index that already exists.
-
In the Specify Indices field, you can limit which indices get restored by specifying an index pattern. For example, entering
- Click Restore snapshot.
After the snapshot is restored, a brief message indicates that the operation was successful.