Kafka and Logstash 1.5 Integration
As you may of heard, we added Apache Kafka support with Logstash 1.5! What is included? Both input and output plugins! This blog is a first in a series of posts introducing various aspects of the integration between Logstash and Kafka. Today, we’ll go over some of the basics.
For documentation on all the options provided you can look at the plugin documentation pages:
Quick Background: What is Kafka?
The Apache Kafka homepage defines Kafka as:
"Kafka is a distributed, partitioned, replicated commit log service. It provides the functionality of a messaging system, but with a unique design."
Why is this useful for Logstash? Kafka is quickly becoming the de-facto data-bus for many organizations and Logstash can help enhance and process the messages flowing through Kafka. Another reason may be to leverage Kafka's scalable persistence to act as a message broker for buffering messages between Logstash agents.
Getting Started
Here, we will show you how easy it is to set up Logstash to read and write from Kafka.
Launching Kafka
You may follow these instructions for launching a local Kafka instance. Once launched, you can go ahead and create a test topic we will use in the examples.
# create "logstash_logs" topic
$ bin/kafka-topics.sh --create --zookeeper localhost:2181 --replication-factor 1 --partitions 1 --topic logstash_logs
Writing to Kafka
Kafka comes with a simple console producer to help quickly test writing to Kafka. In some ways, it is even easier to use Logstash as a replacement for that tool! We can use the stdin input plugin to allow us to write messages to a specific Kafka topic.
$ bin/logstash -e "input { stdin {} } output { kafka { topic_id => 'logstash_logs' } }"
Producer Details
Logstash Kafka output plugin uses the official Kafka producer. All of its options are exposed to the plugin. One important option that is important is the request_required_acks which defines acknowledgment semantics around how many Kafka Brokers are required to acknowledge writing each message. By default, this is set to 0 -- this means that the producer never waits for an acknowledgement. This option provides the lowest latency but the weakest durability guarantees. Setting this to 1, the producer will wait for an acknowledgement from the leader replica. -1 is the safest option, where it waits for an acknowledgement from all replicas that the data has been written. More details surrounding other options can be found in the plugin’s documentation page and also Kafka's documentation.
Reading from Kafka
To verify that our messages are being sent to Kafka, we can now turn on our reading pipe to pull new messages from Kafka and index them into using Logstash's elasticsearch output plugin.
$ bin/logtash -e "input { kafka { topic_id => 'logstash_logs' } } output { elasticsearch { protocol => http } }"
Consumer Details
The Kafka input plugin uses the high-level consumer under the hoods. Each instance of the plugin assigns itself to a specific consumer group (“logstash” by default). This way we leverage the partitioning properties of consuming data from Kafka as is done in the high-level consumer. By leveraging these consumer groups we can simply launch multiple logstash instances to scale the read throughput across the partitions. Kafka implements a consumer rebalancing algorithm to efficiently distribute partitions across newly introduced consumers. Consumer offsets are committed to Kafka and not managed by the plugin. You may want to replay messages -- if that is the case, offsets can be disregarded and you may read from the beginning of a topic by using the reset_beginning configuration option. Storage of consumer offsets is defaulted to Zookeeper. More details surrounding other options can be found in the plugin’s documentation page.
Scaling Logstash with Kafka
Logstash processing pipelines can grow very complex and cpu-intensive as more plugins like grok are introduced. By default, Logstash implements a back-pressure mechanism wherein inputs are blocked until the later processing units are free to accept new events. Under this scheme, input events are buffering at the source. This may be a problem for inputs which do not natively support buffering of sent messages, and may create additional resource constraints on inputs like file (e.g. disk usage). Kafka lends itself very nicely to this pipelining strategy because consumers are disconnected from producers, and Kafka is designed to hold a healthy buffer of events to be processed. As data volumes grow, you can add additional Kafka brokers to handle the growing buffer sizes.

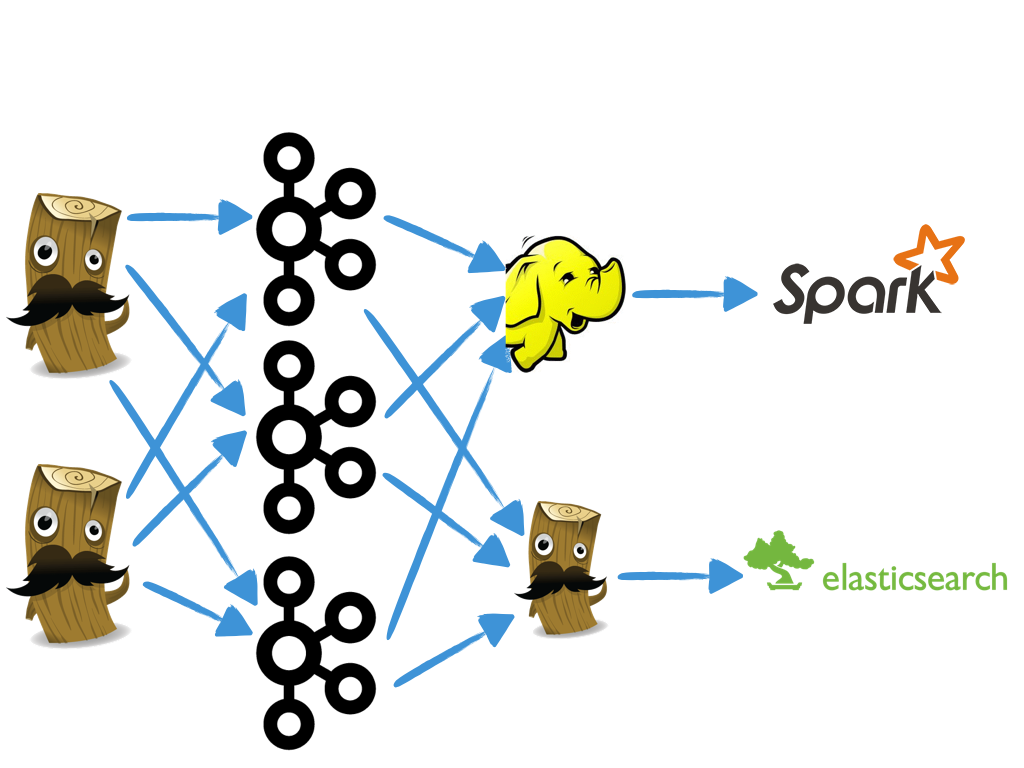
The diagram above demonstrates an example topology where Logstash agents are collecting local log file events and pushing them to Kafka, and another Logstash agent, in addition to other services can parallelly consume those messages for further processing. In this scenario, Kafka is acting as a message queue for buffering events until upstream processors are available to consume more events. Additionally, as you are buffering your events in Kafka, you may wish to leverage other data storage/processing tools for secondary processing of your events. For example, you may want to archive your logs to S3 or HDFS as a permanent data store.
State of the Integration
The current version of the output plugin uses the old 0.8 producer. We have plans to release a newer version of the output plugin utilizing the new 0.8.2 producer. You can learn more about the changes here. The new producer contract brings in lots of changes to the API, so the next version of the output plugin will not be backwards compatible with the current version. We plan to release this new producer with Logstash 1.6. You can continue to use the old version by not upgrading at the time of release.
What’s Next!
In our next blog post in this series, we’ll take a look at using your own serialization with Kafka and we’ll give you an example of how to use Apache Avro as such a serialization.