How to configure Elasticsearch SAML authentication with ADFS
This blog post provides instructions for configuration of Elasticsearch SAML authentication in environments where Microsoft Active Directory Federation Services (ADFS) is used as an identity provider (IdP) for an Elasticsearch SAML realm. The main purpose is to establish a working solution, which can be taken as a baseline for more advanced configurations that depend on use case–specific requirements. Additional configuration options that are not discussed in this blog post are available in Elasticsearch SAML guide, Elasticsearch Service SAML documentation, and Elastic Cloud Enterprise SAML documentation.
Prerequisites:
- Elasticsearch cluster with at least 1 node and Kibana
- Windows Server 2016, 2019, 2022
- Active Directory Domain Services (AD DS)
- Active Directory Federation Services (ADFS)
For the purposes of this blog, the following configuration was used:
- Kibana URL: https://kibana.example.com/li>
- ADFS FQDN: adfs.saml.lab
- Domain: saml.lab
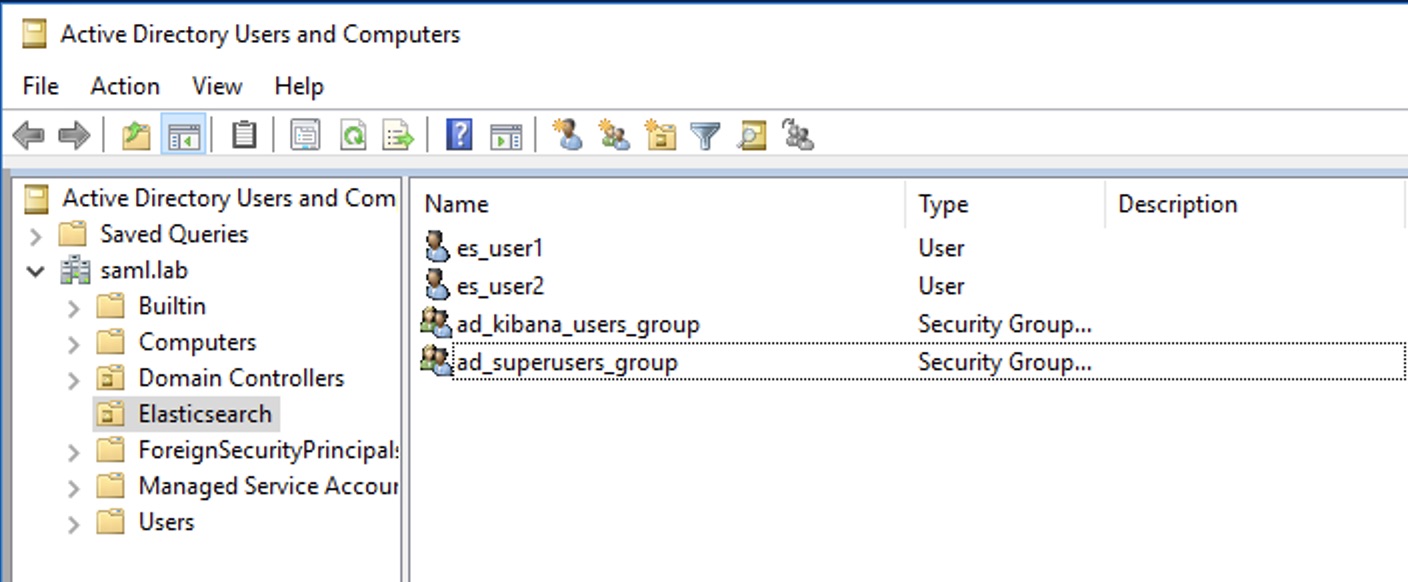
- AD groups: kibana_user, superuser
- User 1 (member of ad_kibana_users_group group): [email protected]
- User 2 (member of ad_superusers_group group): [email protected]
Configuring the SAML realm in elasticsearch.yml
To configure the SAML realm, you will open Elasticsearch.yml file in an editor, add the following configuration on all the ES nodes, and restart them. If Elasticsearch Service is used, you would update Elasticsearch node user overrides configuration as per this documentation page.
xpack.security.authc.realms.saml.saml-adfs:
  order: 2
idp.metadata.path: metadata/FederationMetadata.xml
idp.entity_id: "https://adfs.saml.lab/adfs/services/trust"
  sp.entity_id:  "https://kibana.example.com/"
  sp.acs: "https://kibana.example.com/api/security/saml/callback"
  sp.logout: "https://kibana.example.com/logout"
  attributes.principal:
"http://schemas.xmlsoap.org/ws/2005/05/identity/claims/upn"
   attributes.groups: "http://schemas.xmlsoap.org/claims/Group"
  nameid_format:
"urn:oasis:names:tc:SAML:1.1:nameid-format:unspecified"
Configurations specifics:
idp.metadata.path references the location where the SAML metadata of the IdP (FederationMetadata.xml in this example) is accessible. There are two ways of providing the SAML metadata of the IdP to Elasticsearch: one by uploading the metadata file to all the nodes (in Elasticsearch Service you use a bundle as described here) into a folder that Elasticsearch process can access, or by specifying an https URL where metadata is accessible.
idp.entity_id is the EntityID of the SAML IIdP, as it is also specified in the IdP metadata file.
Sp.entity_id is the SAML EntityID, a string that will identify this service provider (SP). Entity IDs are matched as strings and not as canonicalized URLs, so things like trailing slashes and port numbers matter. Note that the SP EntityID is only an identifier and will never need to be resolved or accessed as a URL.
sp.acs: The Assertion Consumer Service (ACS) endpoint is the URL within Kibana that accepts authentication messages. This ACS endpoint supports the SAML HTTP-POST binding only. It must be a URL that is accessible from the web browser of the user who is attempting to log in to Kibana; it does not need to be directly accessible by Elasticsearch or the IdP.
Sp.logout must be configured as the URL in Kibana that accepts logout messages. Please note that configuring SAML logging will require certificate configuration to sign SAML messages. Configuring certificates and message signing is out of scope for this blog post, but detailed configuration is available on this documentation page.
Attributes.principaldefines which attribute from the attribute statement of the SAML response that the IdP sends, and should be mapped and used as the user principal in Elasticsearch and Kibana. For the purpose of this blog post, you will describe how UPN or the SAML NameID with persistent format can be mapped. More information on attribute mapping for the SAML realm is available here.
attributes.groups defines which attribute from the attribute atatement of the SAML response that the IdP sends, and should be mapped as the groups property of the user in Elasticsearch and Kibana. The mapped values can then be used to assign roles to specific users.
nameid_format defines the NameID format that Elasticsearch will request from ADFS when sending the SAML authentication request at the beginning of the SAML SSO flow. The value is important, because if ADFS is not correctly configured to “release” a NameID with the same format, the authentication will fail. If you don’t plan to use a persistent NameID, you can leave this setting to
urn:oasis:names:tc:SAML:1.1:nameid-format:unspecified is the default format that ADFS supports. If you want to use a persistent Name ID, then set the value to urn:oasis:names:tc:SAML:2.0:nameid-format:persistent and complete the extra configuration step in "Step 2: Configure ADFS claims" below.
Configuring the SAML realm in kibana.yml
In Kibana we need to configure the login selector and add the newly configured SAML realm. To ensure you can login with normal users in case there is an issue with SAML, we also add support for the basic authentication provider to the config added to kibana.yml. If Elasticsearch Service is used, we would update Kibana nodes user overrides configuration as per this documentation page..
 xpack.security.authc.providers:
  saml.saml1:
    order: 0
    realm: saml-adfs
    description: "Log in with my SAML ADFS"
  basic.basic1:
    order: 1
Generate metadata file for use with ADFS
Please note that this step is optional and not available for deployments running in Elasticsearch Service.
Elasticsearch includes a tool that generates a metadata file based on the configuration specified in the yml configuration file. It will output a metadata.xml file that can be imported into ADFS and will simplify configuration of IDP. Detailed instructions for running elasticsearch-saml-metadata are described on this documentation page. For this example we used the following syntax and enter required information about the contact details:
bin/elasticsearch-saml-metadata --realm saml-adfs \
    --service-name kibana-access \
    --locale en-GB \
    --contacts \
    --organisation-name "SAML LAB" \
    --organisation-url "http://saml.lab/demo/"
Configuring ADFS IdP:
To prepare ADFS to act as an IdP for Elasticsearch SAML, you need to complete two parts of configuration. In first part you will configure Relying Party Trust, where you configure ADFS to trust our Elasticsearch cluster. This can be done manually or by using the metadata created with the elasticsearch-saml-metadata tool. In the second part you will configure the type of claims (attributes) that ADFS will forward to Elasticsearch.
Step 1a: Configure the ADFS Relying Party Trust manually:
- In Server Manager click tools and open AD FS Management.
- Expand Trust Relationships, right-click on Relying Party Trust, and select Add Relying Party Trust.
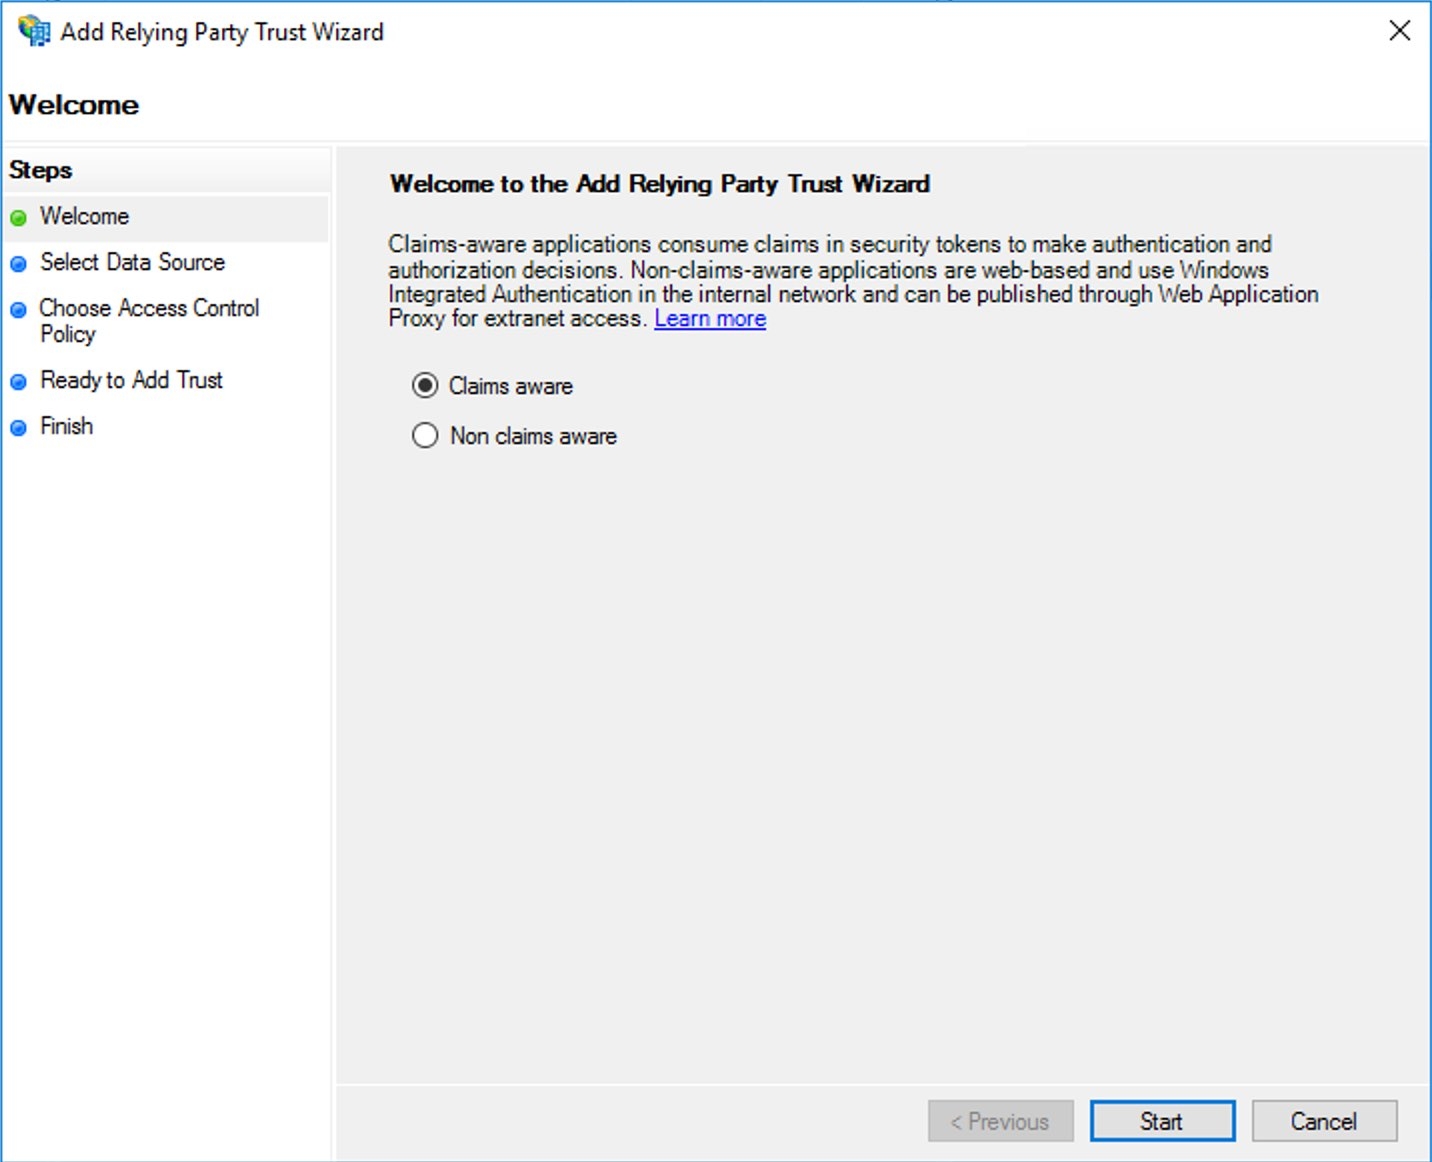
- In the wizard, select Claims aware and click Start.
-
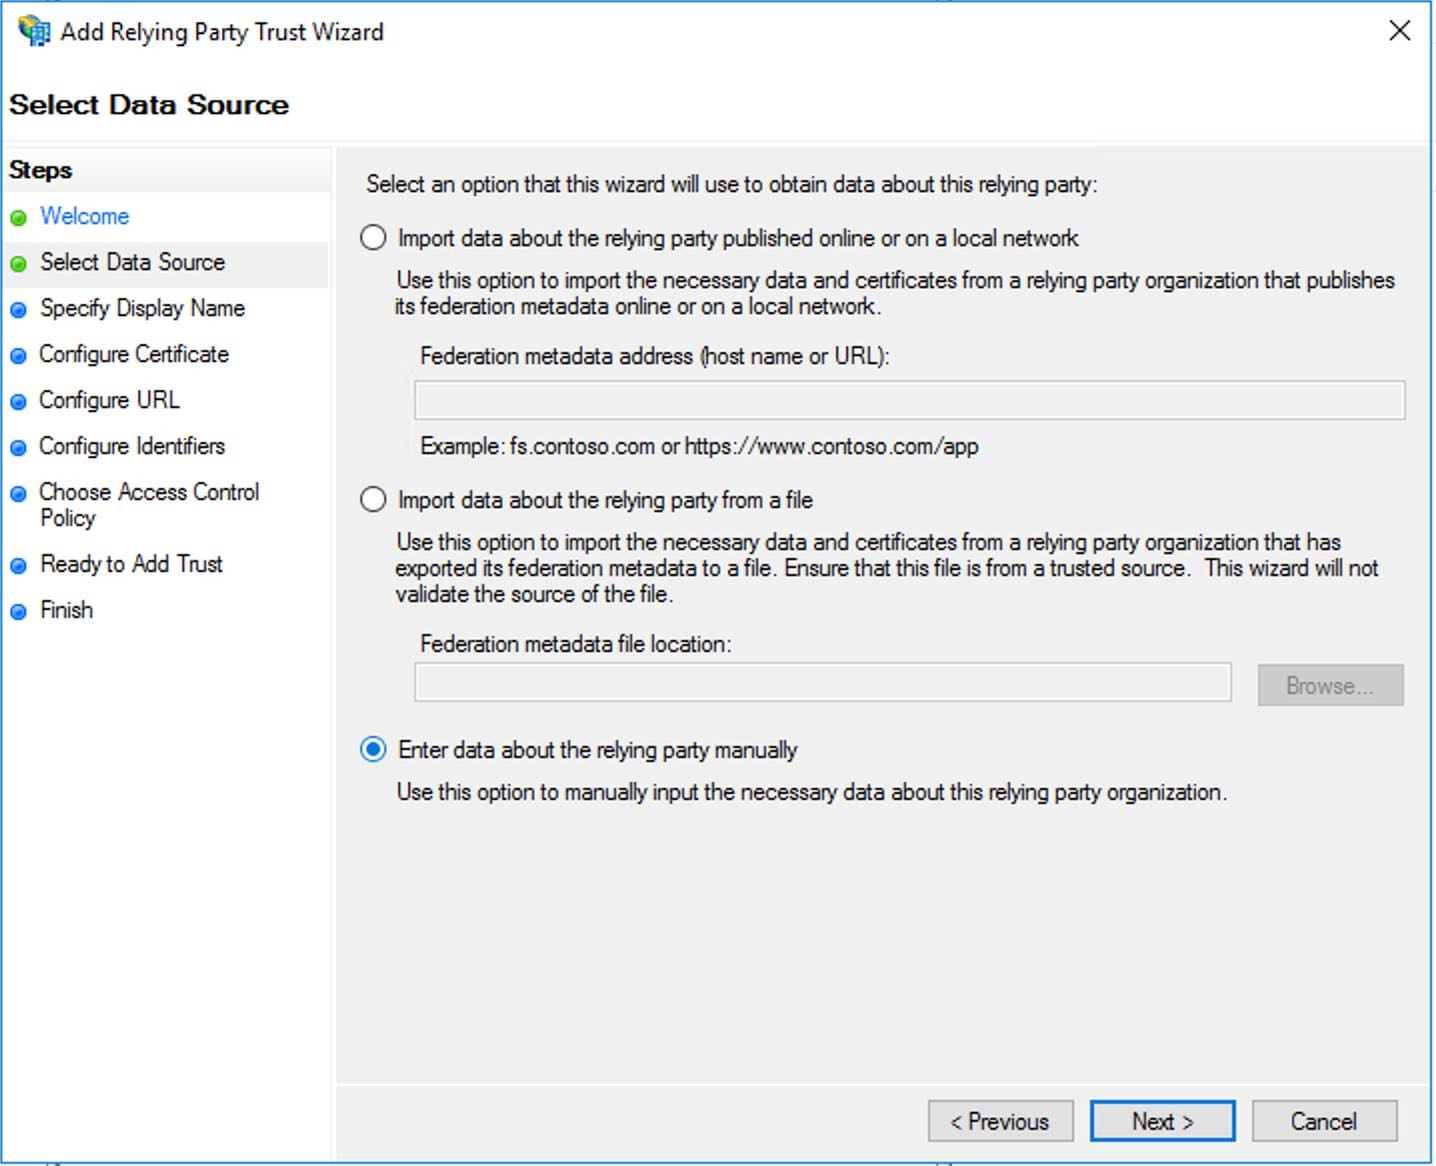
- Select “Enter data about the relying party manually” and click Next.
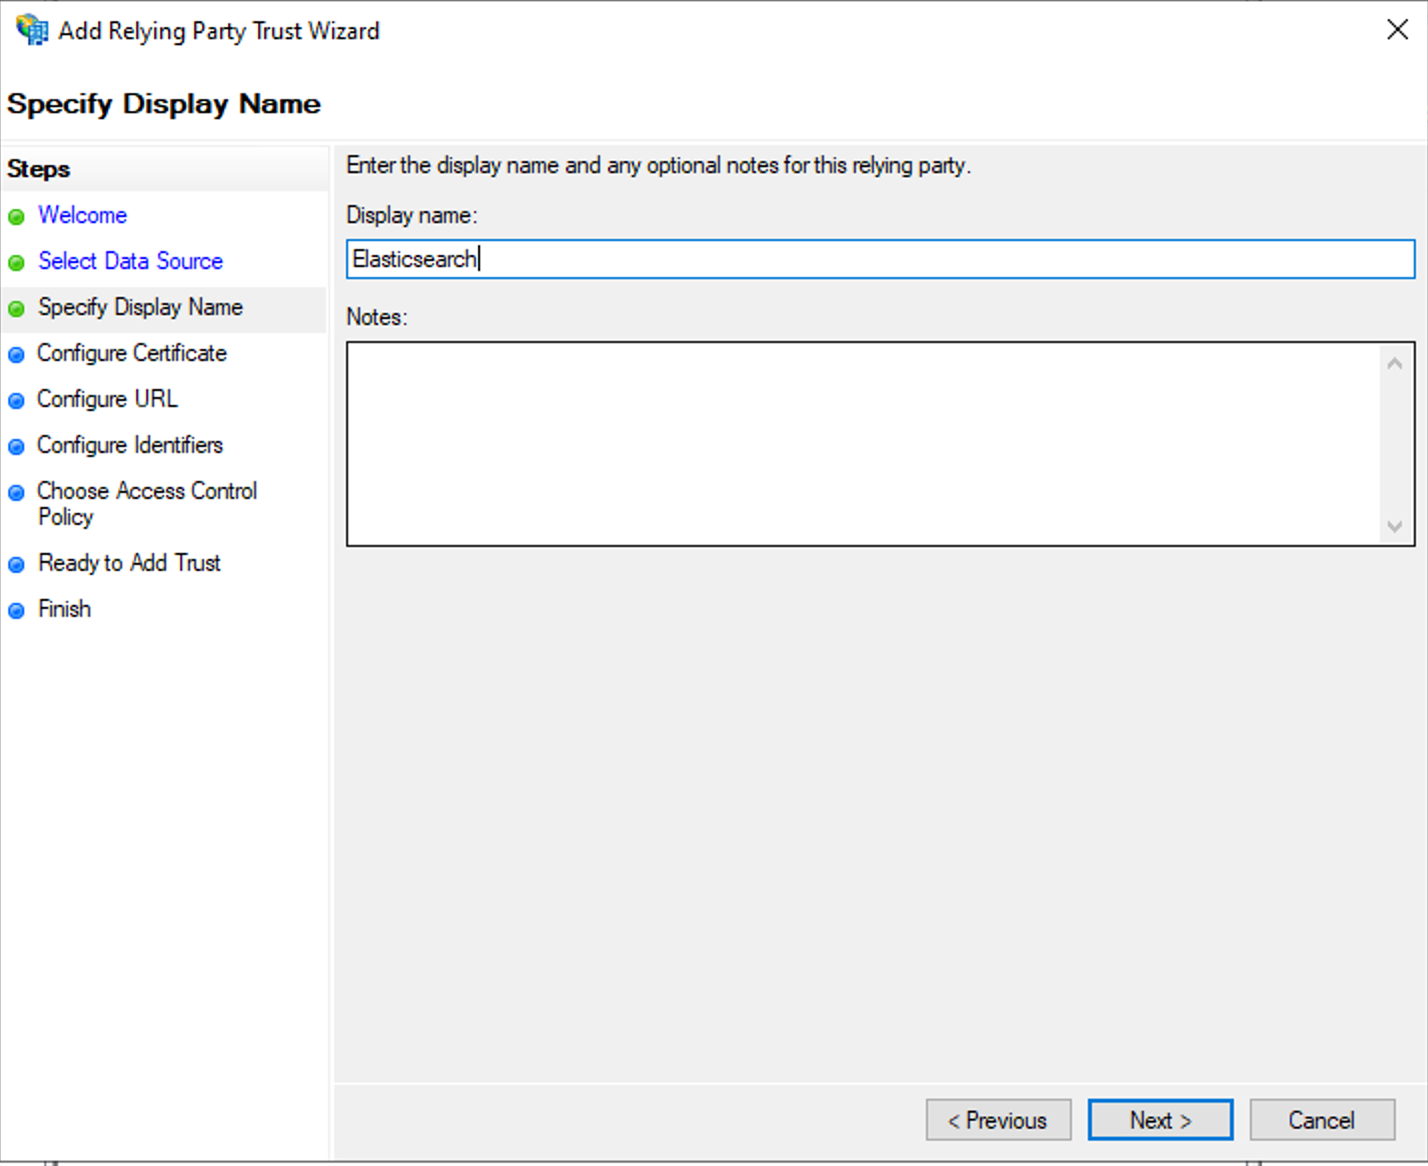
- Enter the display name for the claims provider.
- On the Configure Certificate page, skip configuration and click Next.
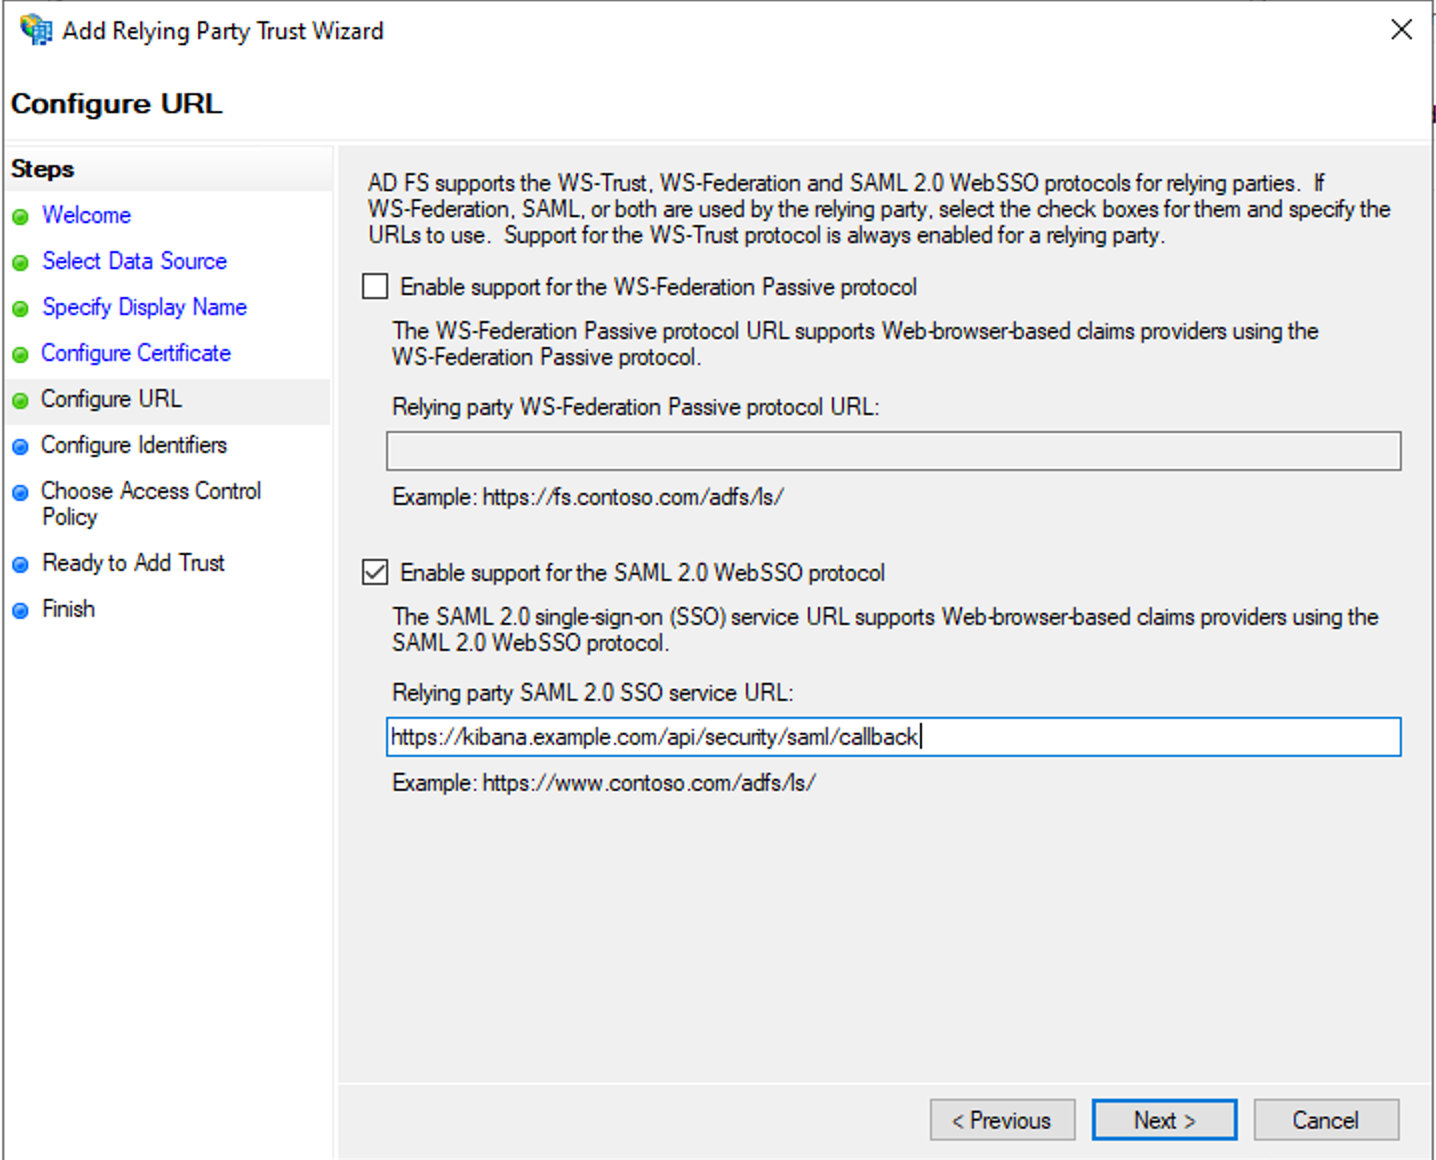
- On the Configure URL page of wizard, enable support for SAML 2.0 Web SSO protocol and enter the SSO service URL. This is the same value you added above in the sp.acs parameter of Elasticsearch SAML realm configuration: https://kibana.example.com/api/security/saml/callback
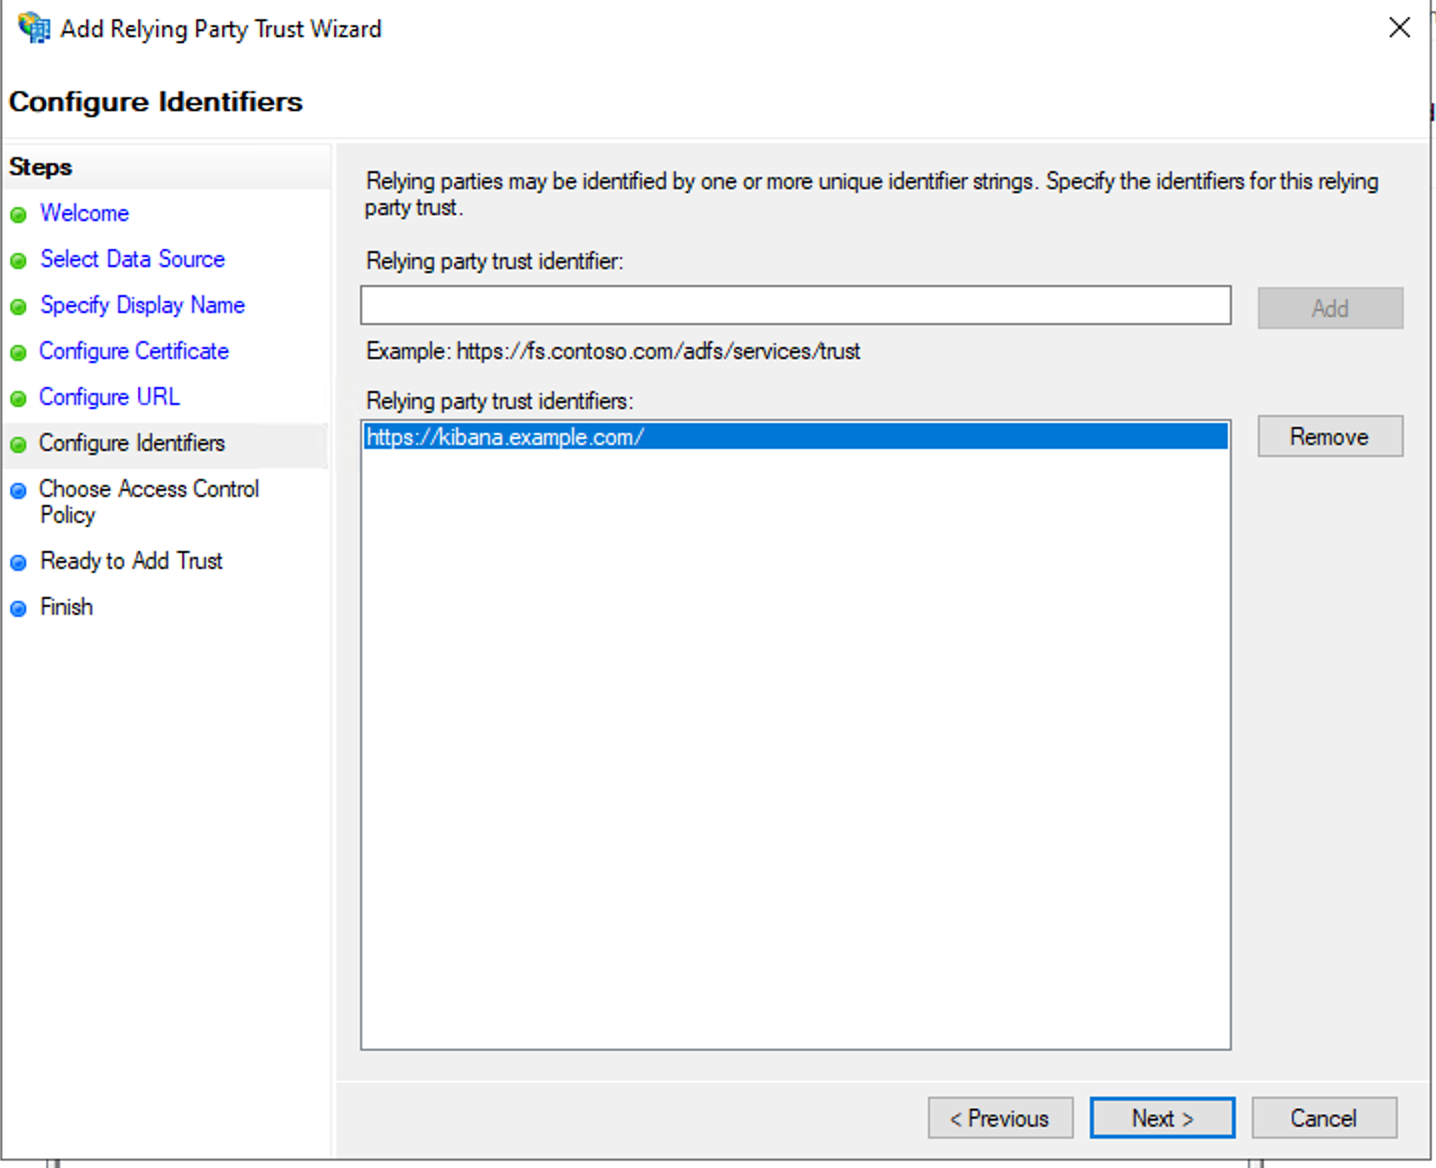
- On the Configure Identifiers step, add the Relying Party Trust identifier, which will be the same string as configured for sp.entity_id in the Elasticsearch SAML realm configuration — in this case that is https://kibana.example.com/.
- On the next three steps you select defaults, or configure which users can use this Relying Party Trust. Detailed configuration is out of scope for this blog.
Step 1b: Configure the ADFS Relying Party Trust by using metadata:
- In ADFS management expand Trust Relationships, right-click Relying Party Trust and select Add Relying Party Trust.
- In the wizard, select Claims aware and click Start.
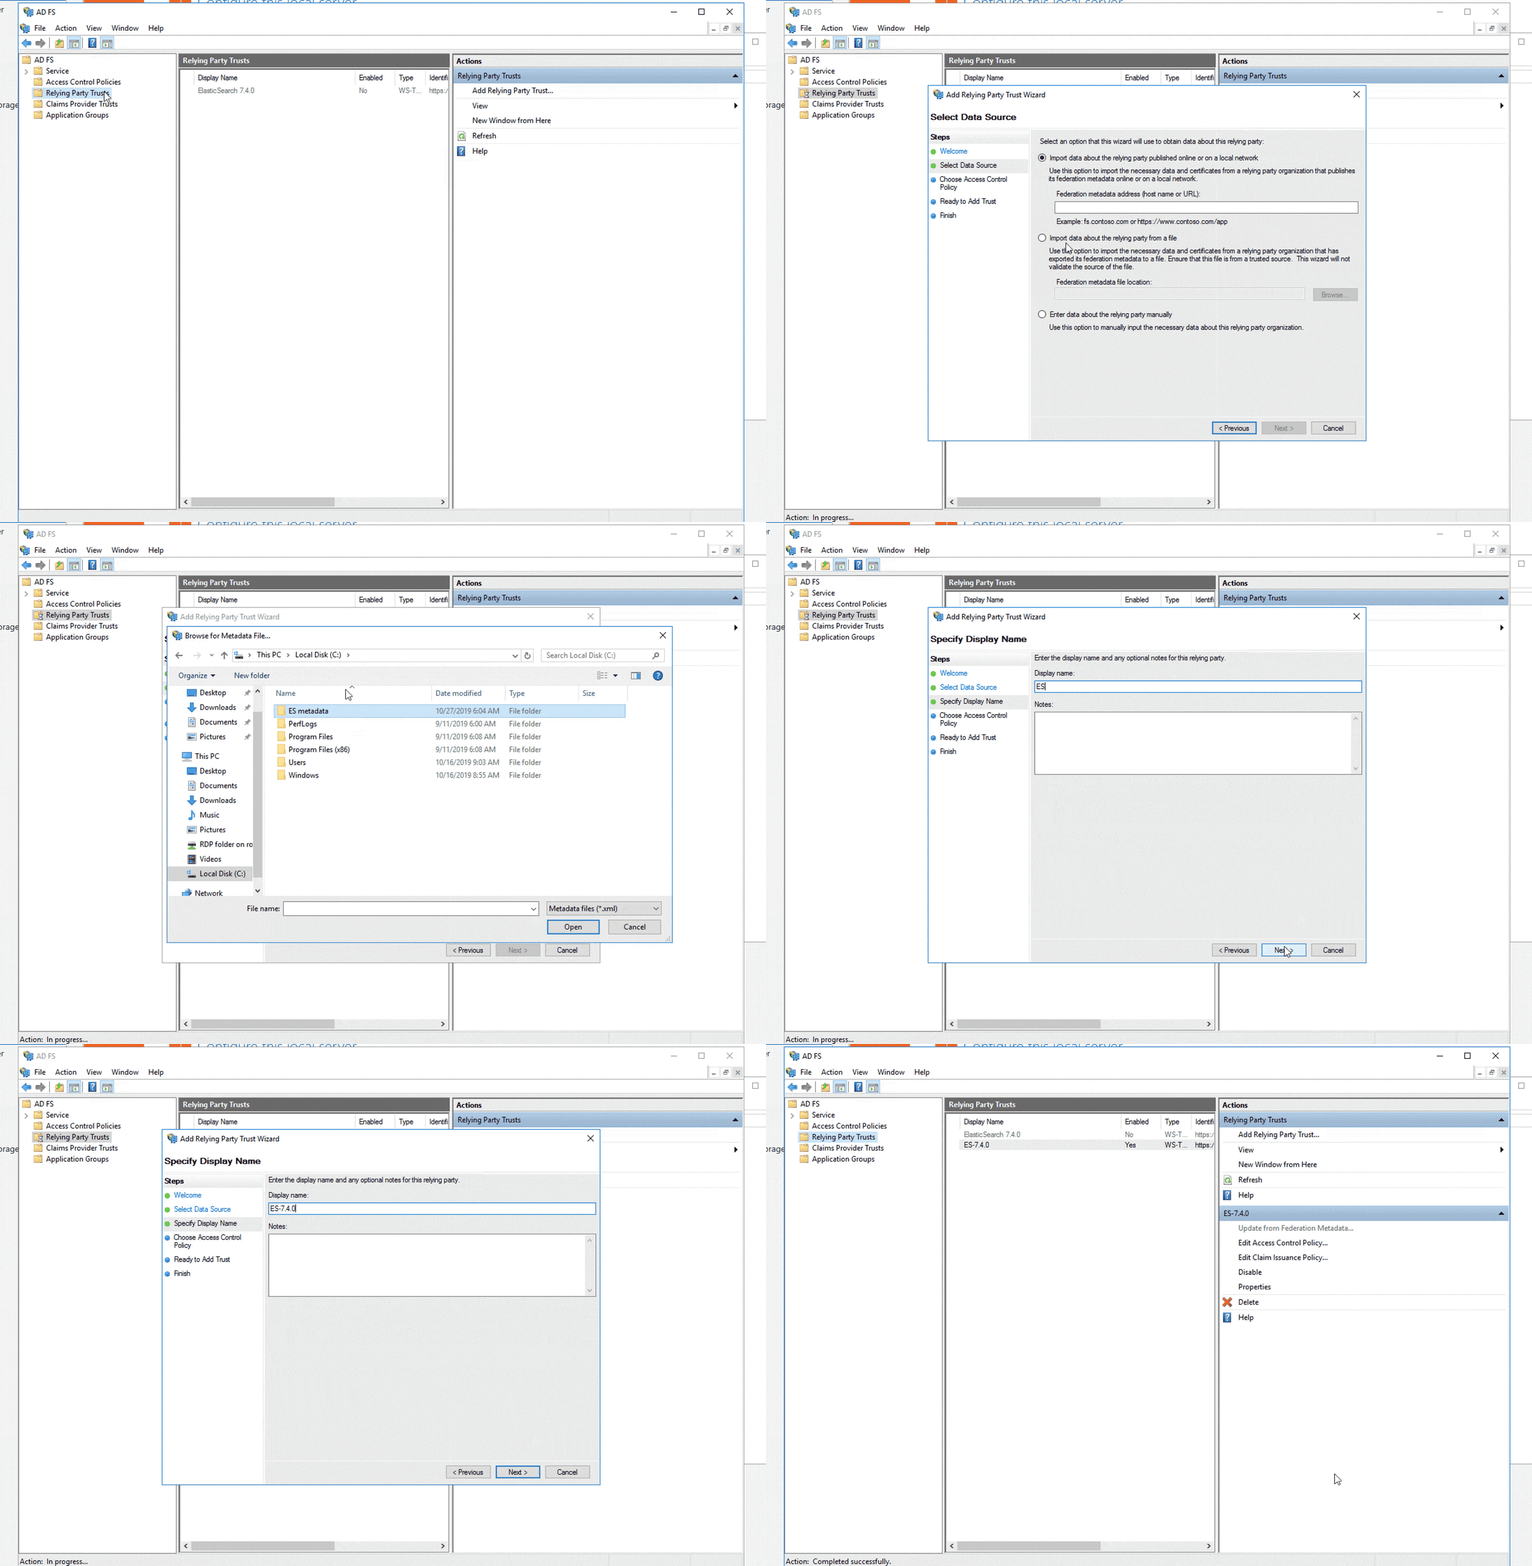
- Select the metadata file created and follow the wizard:
Step 2: Configure ADFS claims:
In the second part you will configure what attributes ADFS will send to Elasticsearch as part of SAML authentication process. For the purposes of this blog post, we will configure ADFS to release both an attribute user principal name (UPN) and a NameID. Both of these can be mapped to attributes.principal in the Elasticsearch configuration, so you can select to configure either one of them. You will also configure a claim for Group membership so that you can then map the values in Elasticsearch using attributes.groups.
- In the Relying Party Trusts (RPT) frame, right-click the newly created Elasticsearch 7.4.0 RPT and select Edit Claim Issuance Policy.
- Select Add Rule to open Add Rule wizard.
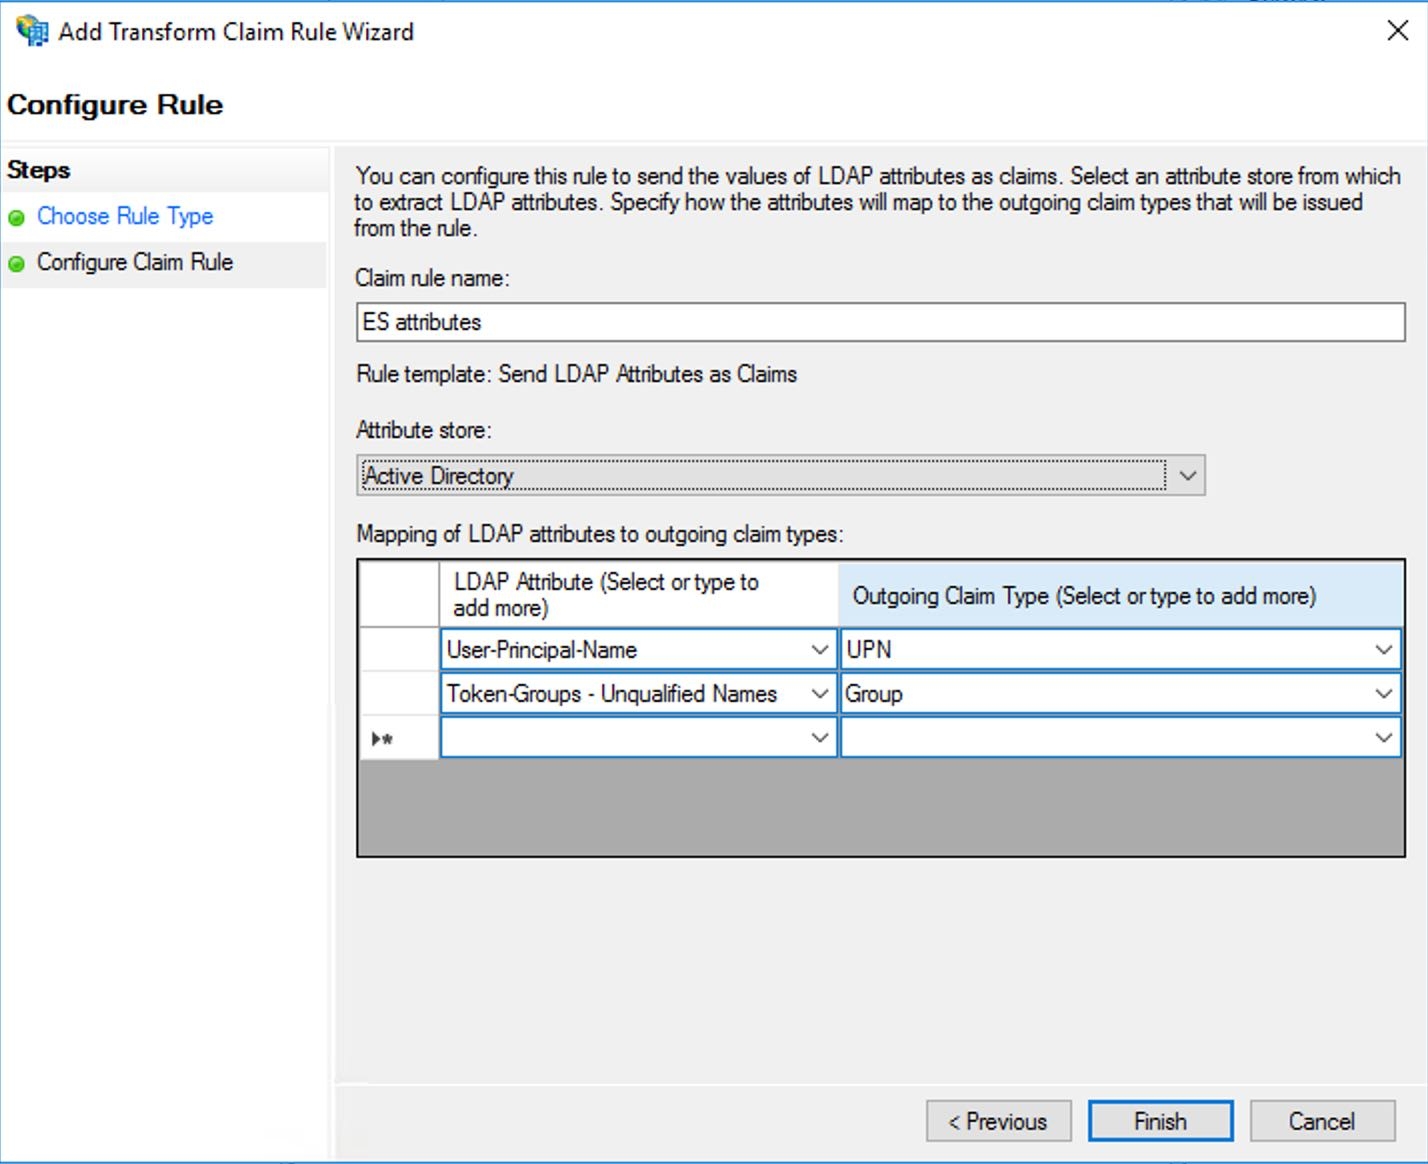
- Select Send LDAP Attributes as Claims and click Next.
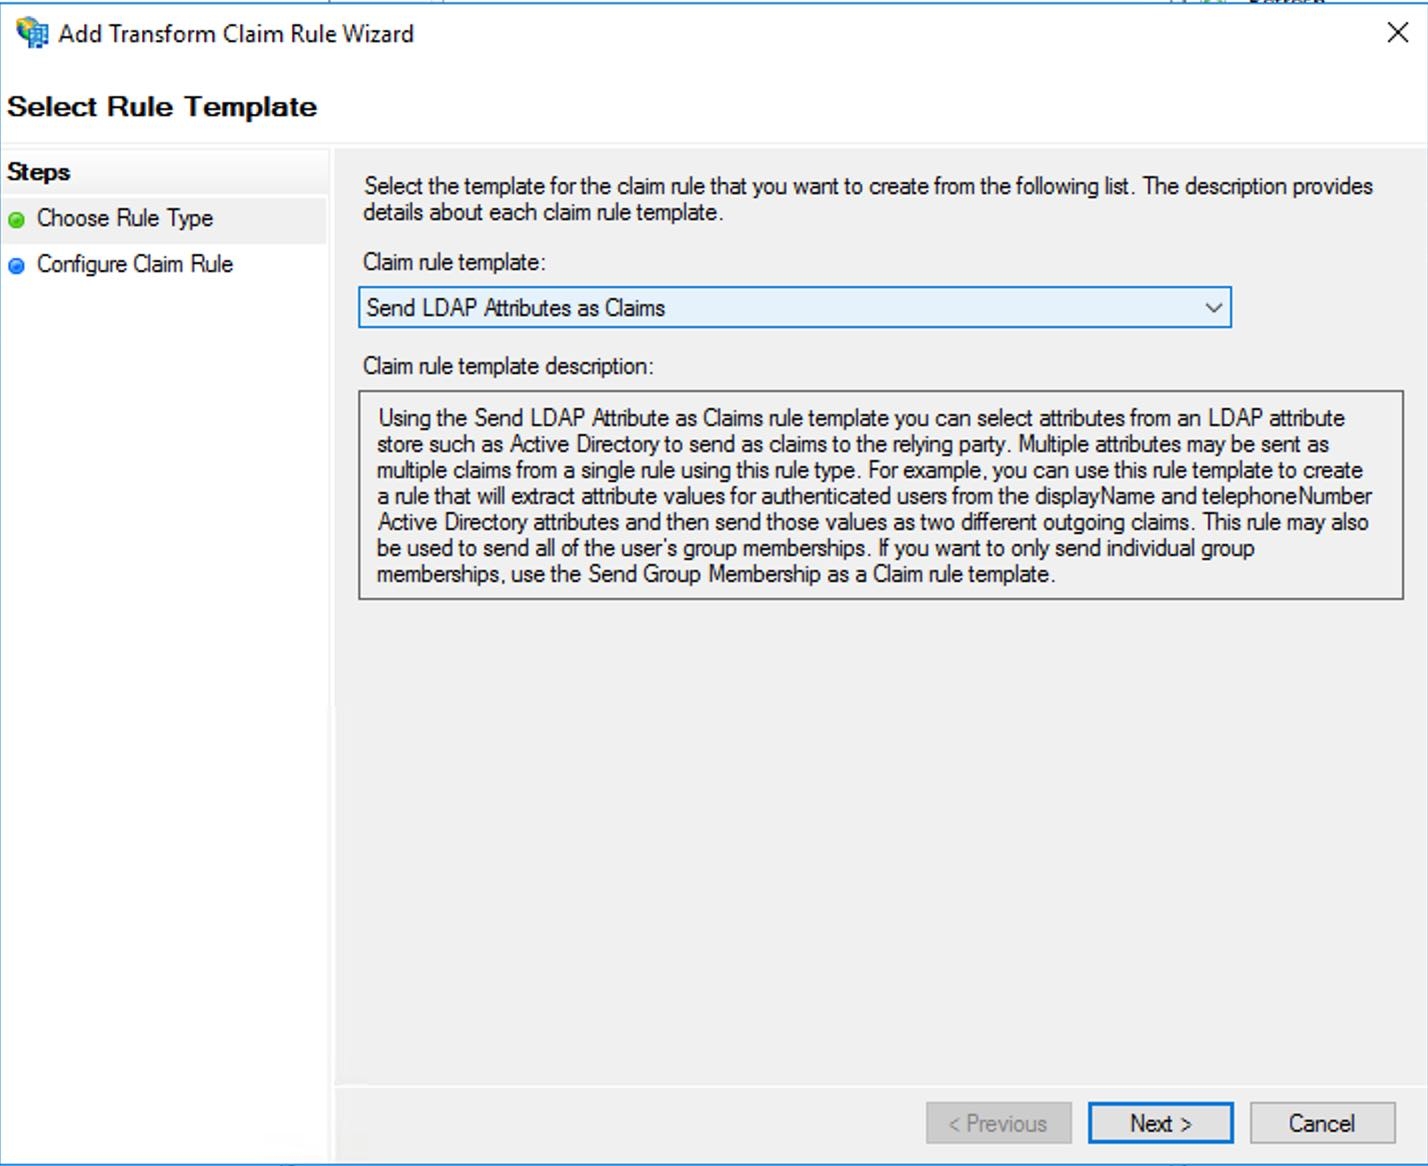
- Enter a new name for the Claim rule, select Active Directory as the Attribute store, and create a new mapping of LDAP attributes to outgoing claim types. Based on our current configuration, you are mapping User-Principal-Name to UPN (type UPN if it doesn't exist) and Token-Groups - Unqualified names - Group. Click Finish.
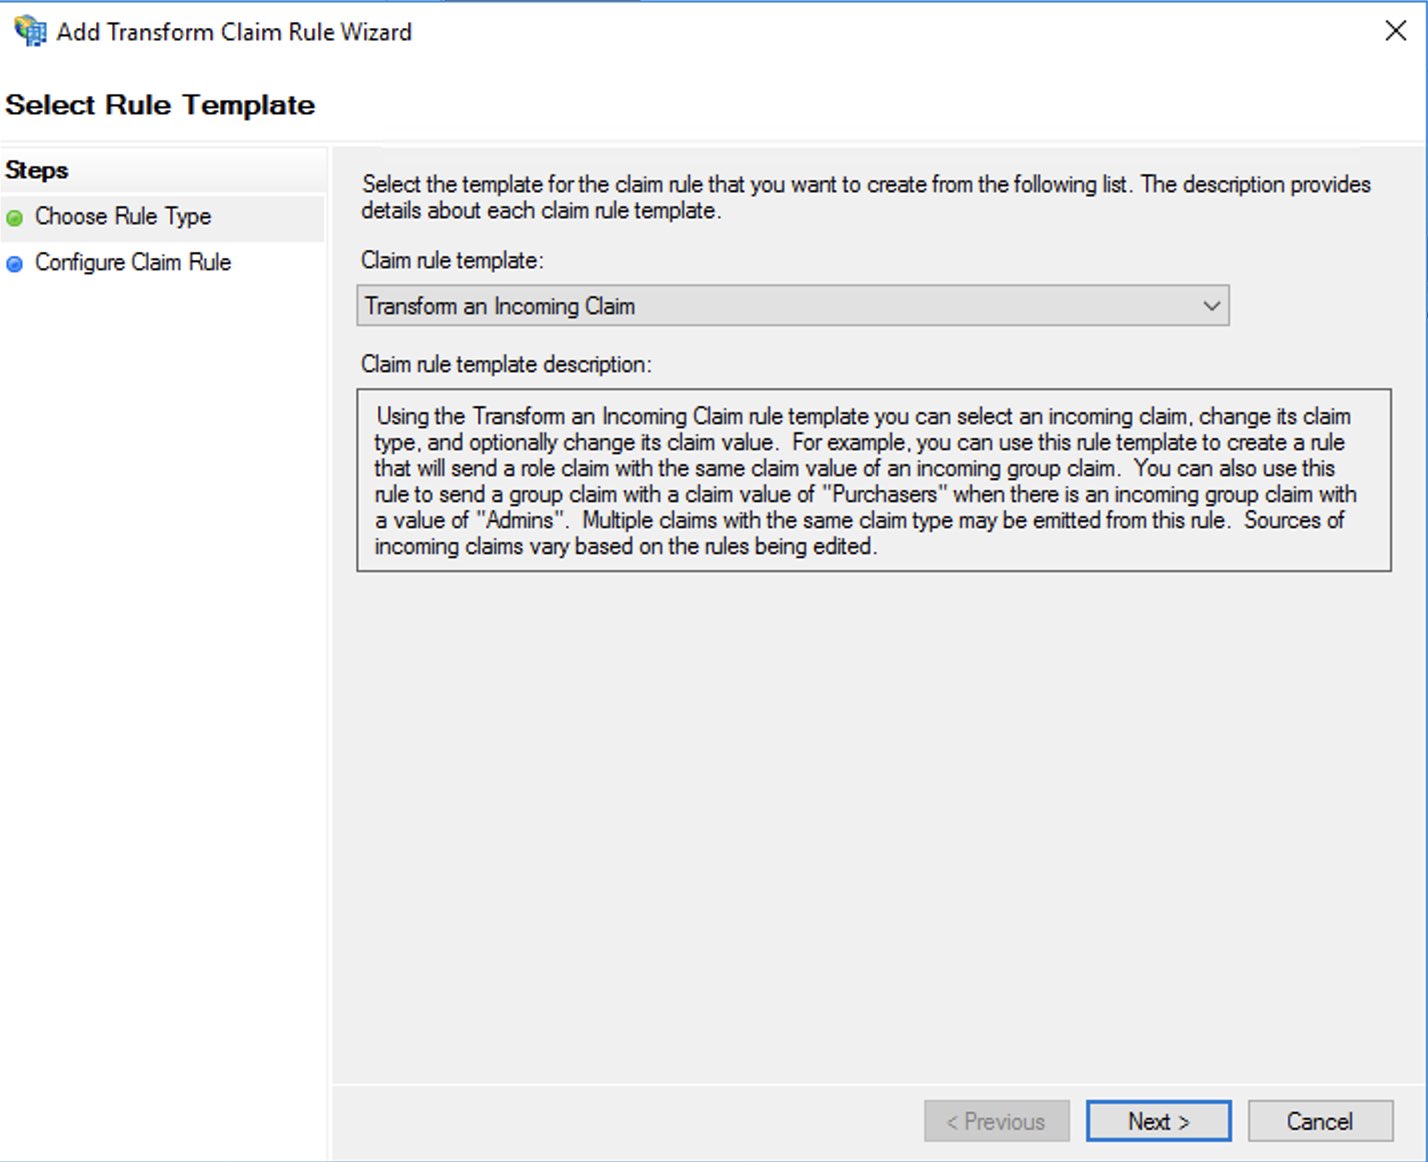
- If attributes.principal: “nameid:persistent” was configured, you need to add an additional claim rule to transform the UPN attribute to persistent NameID. As before, click the Add Rule to open the wizard, but this time select “Transform an incoming claim” template.
- In the next step you configure the transformation of the UPN attribute to Persistent Nameid as per this screenshot and save the newly created rule.
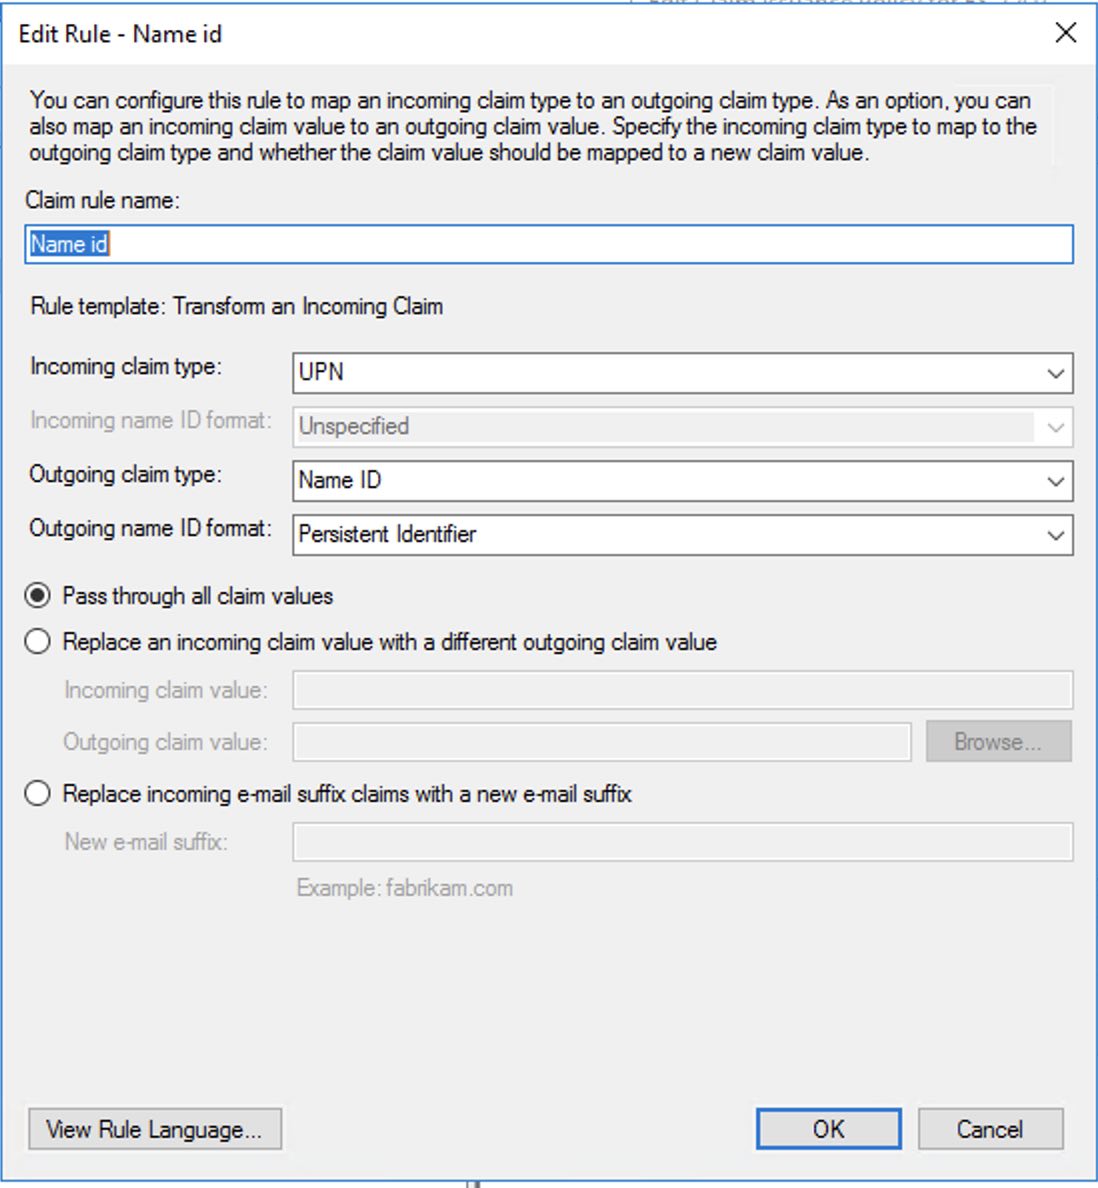
Note, that you don’t necessarily have to use UPN as the incoming claim type, but can select another value if it better suits the configuration.
This concludes configuration of ADFS.
Configuring SAML role mappings
When you configured Kibana setting for SAML authentication, you enabled the saml authentication provider, as well as the basic authentication provider by configuring xpack.security.authc.providers: [saml, basic]. This enables us to log in into Kibana even if SAML authentication is currently not working. With both saml and basic provider enabled, you need to navigate to
Superuser mapping:
POST /_security/role_mapping/saml-superuser
{
    "enabled" : true,
    "roles" : [
      "superuser"
    ],
    "rules" : {
      "all" : [
        {
          "field" : {
            "realm.name" : "saml-adfs"
          }
        },
        {
          "field" : {
            "groups" : "ad_superusers_group"
          }
        }
      ]
    },
    "metadata" : { }
  }
Kibana_user mapping:
POST /_security/role_mapping/saml-kibana
{
    "enabled" : true,
    "roles" : [
      "kibana_user"
    ],
    "rules" : {
      "all" : [
        {
          "field" : {
            "realm.name" : "saml-adfs"
          }
        },
        {
          "field" : {
            "groups" : "ad_kibana_users_group"
          }
        }
      ]
    },
    "metadata" : { }
  }
Log in with SAML and enjoy
If all is correct, you should now be able to log in into Kibana with SAML. After navigating to https://kibana.saml.lab:5601 you are redirected to the ADFS login page that looks like the screenshot below — without the awesome ELK B :) — and after entering credentials you will be logged into Kibana.

In case of issues
SAML authentication has many different components, so a good troubleshooting plan enables us to resolve issues quickly. As a first step, you should review Elasticsearch and ADFS logs. Elasticsearch log location will be based on your Elasticsearch configuration, and ADFS logs are located in the Event Viewer under Application and Services logs:

Configuration issues should produce logs describing the issue. If you don’t see any issues in ADFS or Elasticsearch logs, we have a great documentation page that describes common SAML issues, and you can use it as a reference to see if your issue matches any of the common issues. If you still don’t find anything that matches the issue, you can increase the logging level for SAML events in Elasticsearch, and review the trace logs. To increase the level of SAML logs, you need to configure the following cluster setting:
PUT /_cluster/settings
{
  "transient": {
    "logger.org.elasticsearch.xpack.security.authc.saml": "trace"
  }
}
Please note that this will provide a large number of logs, which can lead to disk space problems on Elasticsearch nodes, so once a couple of SAML events are captured, logging should be reverted back to normal.
